New Features of VSC 4.0
- Updated Sign In Page
- Date of Birth (DOB) Verification
- PM Database Connection
- Ability to Update Demographics
- Ability to Send PDF Directly to the Registration
Module of CPS
- Ability to Update
Authorizations on “Additional” Tab in Registration Module of CPS
- Updated Add Document Dialog Box
- Redesigned Add/Change Template Dialog Box
- Ability to Store Images in the VSC Database
- New System Management settings
- Auto Save Feature
-
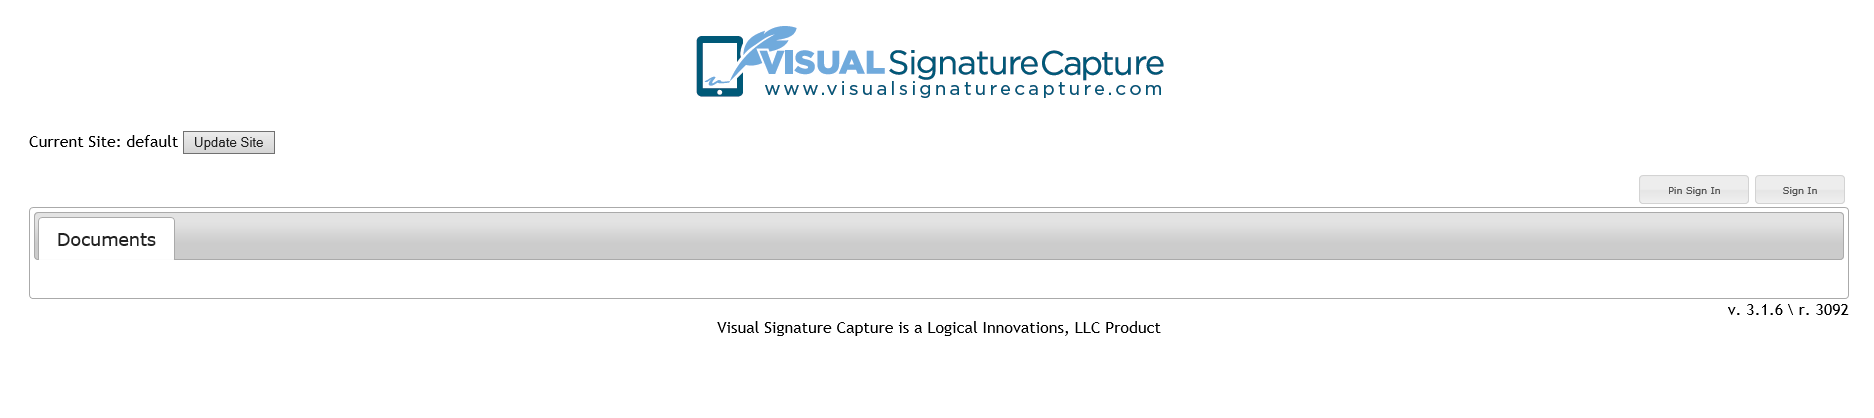
- In prior versions of VSC, one had to click either the "Pin Sign In" or "Sign In" in the upper
right and then enter the required information.
Old Sign In Page:
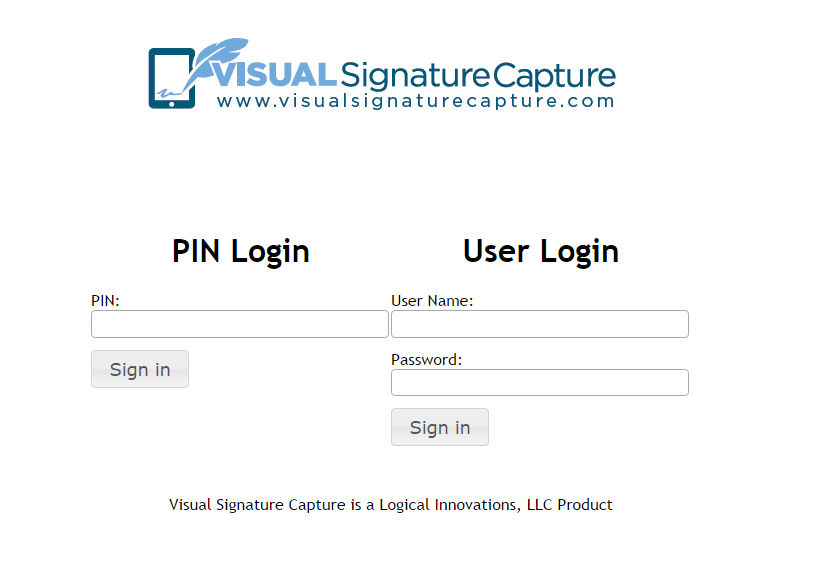
- In VSC 4.0, the Sign In Page has been redesigned so that one simply needs to enter a PIN (for
patients) or a User Name and Password (for Staff, Site Administrators, and Application
Administrators)
New Sign In Page:
-
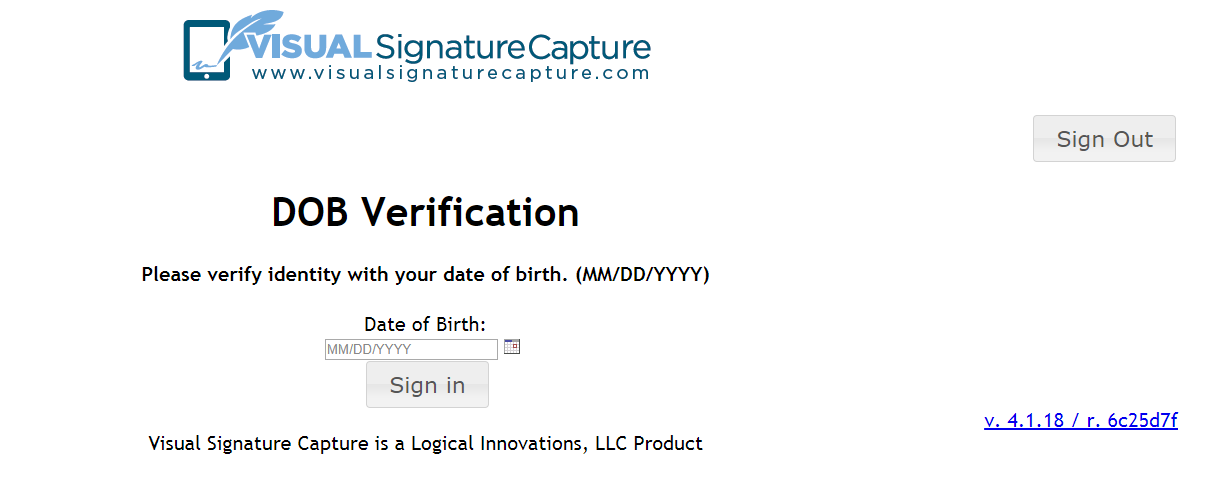
- VSC 4.0 has a secondary patient verification – DOB.
- Whether the patient's home page is accessed via a Staff Member using "Patient View" or using
a PIN, the patient will be asked to enter their DOB:
- Note that the DOB verification can be turned off by setting the System Management Setting
SYSTEM_REQUIRE_DOB_VERIFICATION to "FALSE"
-
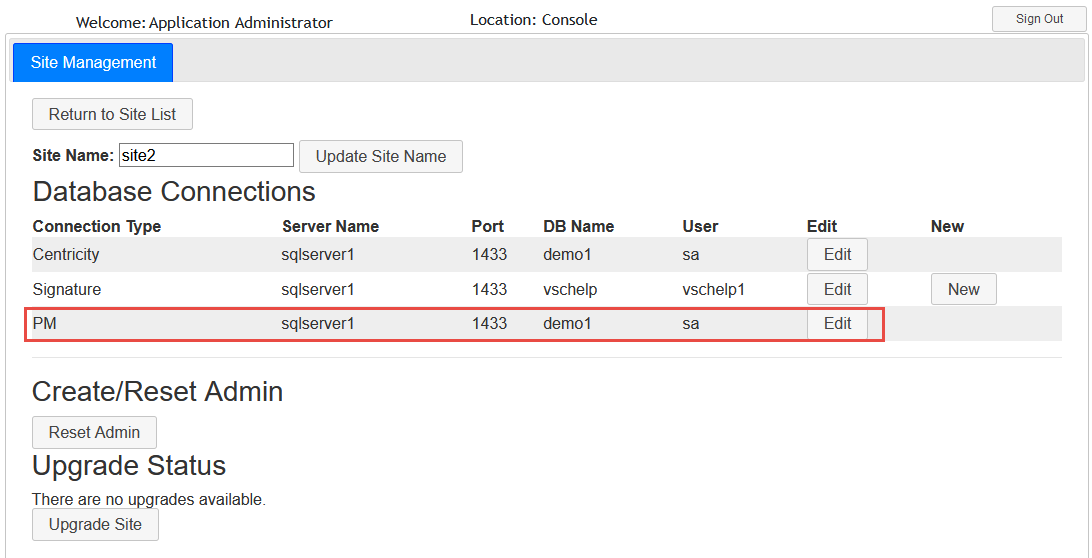
- If a customer plans to:
- Send a PDF directly to the Registration Paperclip in CPS (see V below)
and/or
- Update the "Additional" tab in the Registration module of CPS (see VI below).
the PM database connection needs to be configured. If a customer does not plan to use these
features, the PM connection does not need to be set up.
-
To configure the PM database connection, sign in as the Application Administrator and choose
to edit the customer's PM connection:
- The PM connection will be the same as the Centricity connection if a customer is using CPS. It
will differ if the customer is using the a standalone Centricity EMR (with Oracle db) in
conjunction with a standalone PM (with SQL db).
-
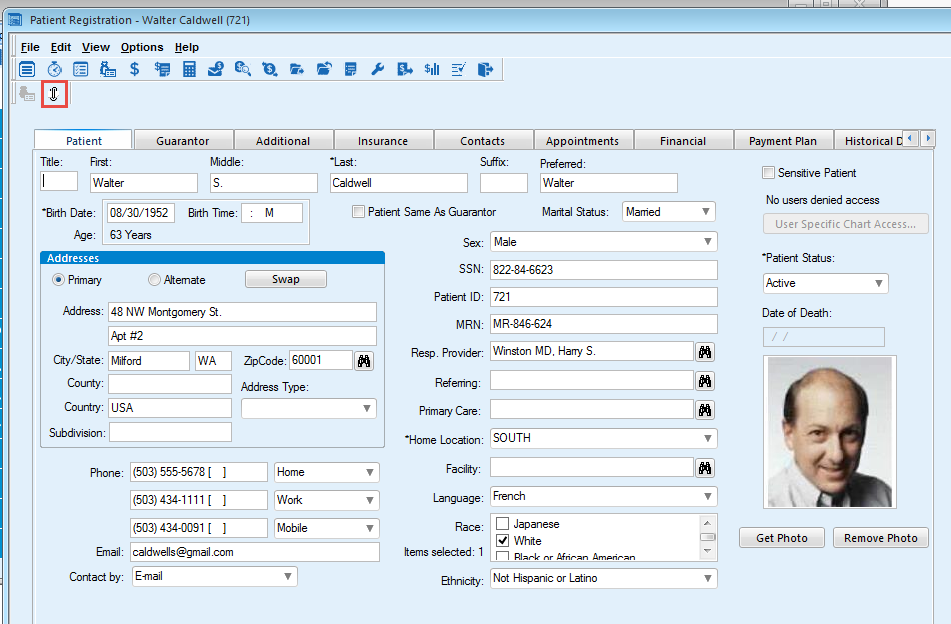
- Many (although not all) Registration fields can be updated using VSC 4.0. These can be
updated in CPS (PM side) or in the standalone Centricity EMR.
- VSC 4.0 supports the ability to update the following fields: Title, First Name, Middle
Name, Last Name, Suffix, Social Security Number, Sex, Address, City, State, Zip Code,
Home Phone, Cell Phone, Work Phone, Email, Preferred Contact Method, Primary
Language, Ethnicity, Race, and Marital Status.
- For some of these fields (such as Marital Status), only certain values will be accepted.
These items are best handled by a drop-down list (or check boxes or radio buttons),
which can default to the previous value if there is one.
- These items can only accept the following values:
- Sex: Male, Female, Undetermined
- Ethnicity: Hispanic or Latino, Not Hispanic or Latino, Undetermined
- Race: White, Black or African American, Asian, American Indian or Alaska
Native, Native Hawaiian or Pacific Islander, Other
- Marital Status: Single, Married, Divorced, Separated, Widowed, Other
- Preferred Contact Method (note IXP file also needed to make this work): Pager,
Cell Phone, Durable Power of Attorney, Email, Fax, Home Phone, Letter,
Nursing Home, Work Phone, Paper, Other
- Primary Language: there are many values that are accepted here. We recommend
a drop-down list containing the languages you expect to see at your site with
additional languages added as necessary.
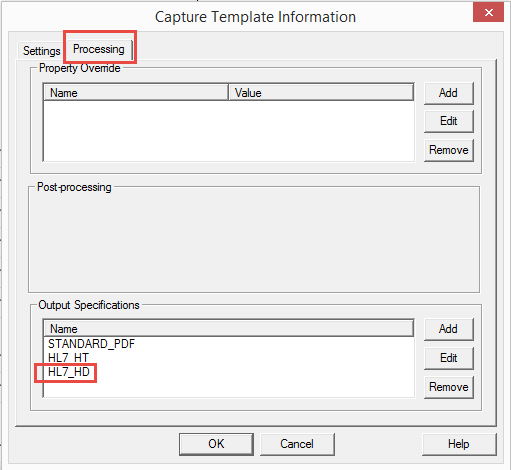
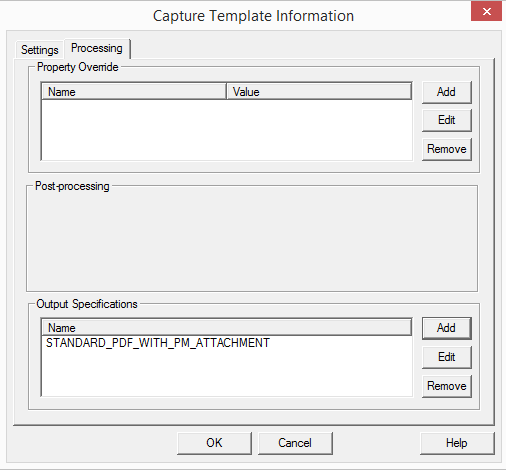
Creating the Template
Templates that have the ability to update demographics need to be built with Visual Form Editor
(VFE) 8. This new version of VFE has an additional tab in
the Capture Template Information dialog box called "Processing." Within the Processing tab,
one can specify the output files that will be created. For templates that are going to update
demographics, a HL7_HD file needs to be specified:
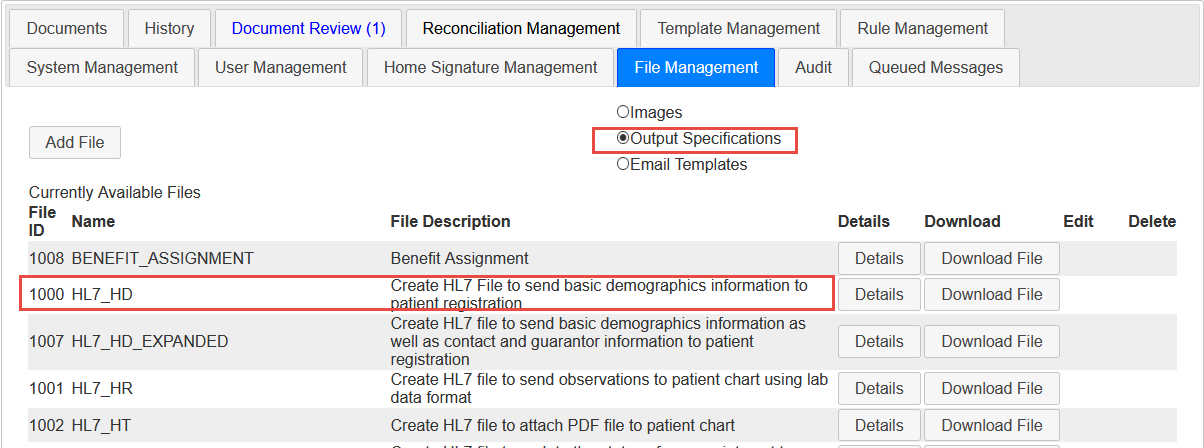
Setting Up VSC
VSC 4.0 has a new tab for the Site Administrators called "File Management". When the "Output
Specifications" radio button is selected, one can add output files. If one is going to use VSC to
update demographics, a HL7_HD file (supplied by Logical Innovations) needs to be uploaded.
Workflow
- Patient fills out a document in which he/she updates demographics. If patient already
has some demographic information on file, that information can be pulled into the
document before the patient begins filling out the form and the patient can update the
necessary fields.
- When the patient is done filling out the form, patient submits the form.
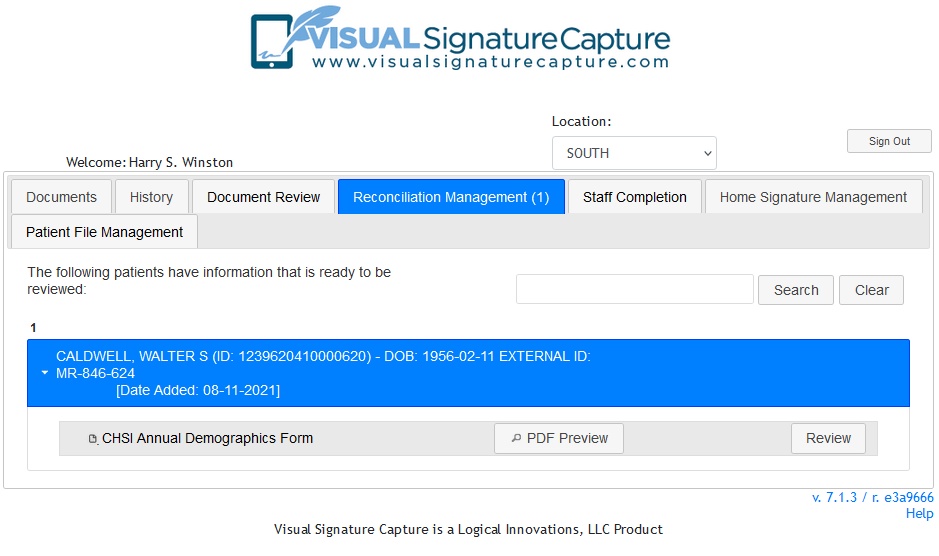
- After a patient has filled out and submitted a demographics document that has changes to the patient's demographics, a Staff member needs
to go to the Reconciliation Management tab (new to VSC 4.0) and click on the Review
button. If the System Management setting SYSTEM_AUTO_DEMOGRAPHIC_REVIEW is set to FALSE, staff will need to approve the document even though there are no changes:
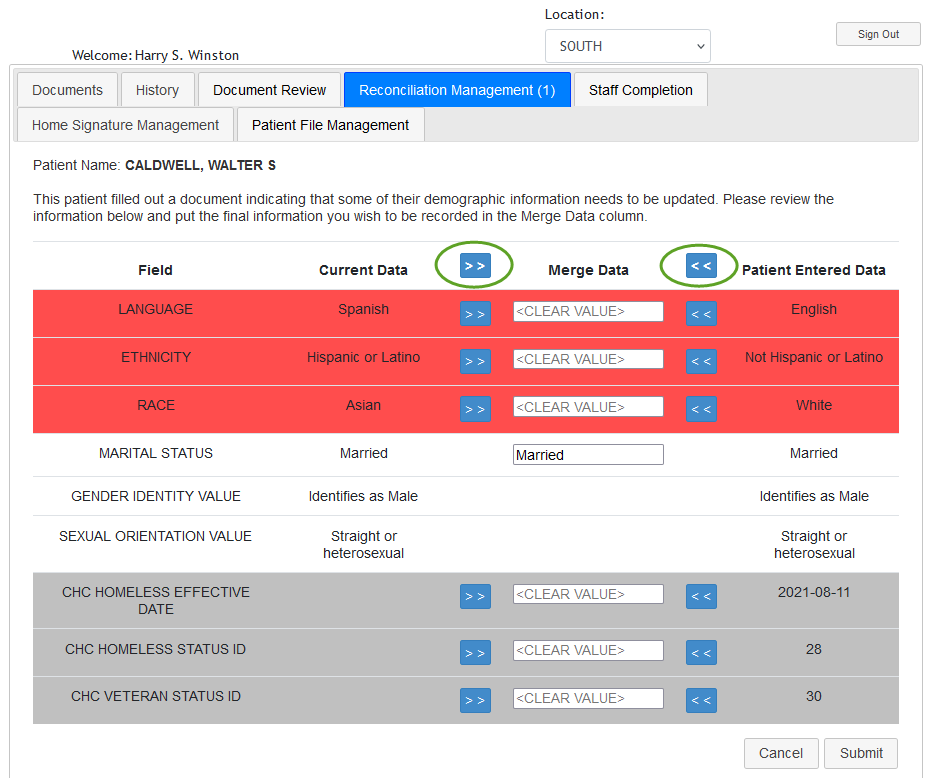
- In reviewing the document, the staff member uses the arrows to select the data that is
currently in the patient's file or the new data that the patient has entered. It is also
possible to choose an alternative value by typing into the Merge Data column. When
done, click the "Submit" button in the lower right corner.
- After Reconciliation is complete, a PDF will be generated and can be seen on the History
tab. Completion of Reconciliation also triggers the generation of HL7 files for import
into Centricity via LinkLogic. [Note – a Demographics interface between VSC and
LinkLogic/Centricity needs to be set up.] Once the HL7_HD file is imported, the
patient's demographics will be updated.
-
- To use this feature, the PM connection (III) needs to be set up.
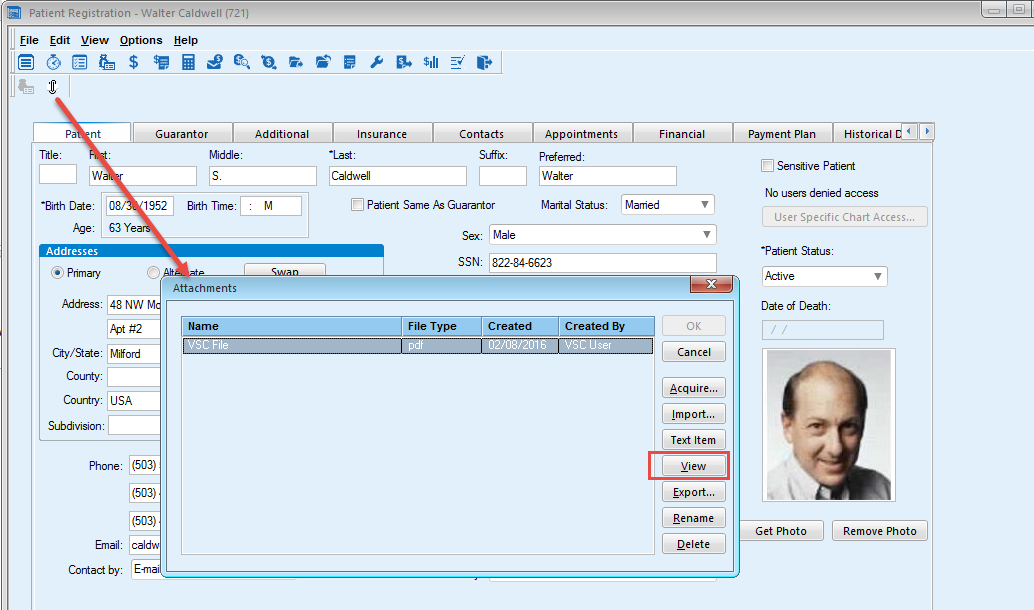
- When a document is signed in VSC, a PDF is generated. Generally, this document is added as
an attachment in the EMR via LinkLogic. [Note that the actual PDF remains in the folder that it
was sent to, it does not reside in the EMR/CPS database. There is just a link.] However, some
organizations prefer to keep certain documents that are more administrative in the PM side of
registration. For that reason, VSC 4.0 allows the ability to send a document directly to the
"paperclip" (as an attachment) to Registration in CPS:
- In order to take advantage of this new feature, one needs to build the template of interest using
VFE 8. The Output Specification
"STANDARD_PDF_WITH_PM_ATTACHMENT" must be included on the Processing tab of
the Capture Template Information dialog box.
- A STANDARD_PDF_WITH_PM_ATTACHMENT file (supplied by Logical Innovations) also
has to be loaded into the Output Specifications of VSC (as in IV. B above).
- Once these two requirements are in place, when a patient signs and submits a document, the
PDF will be linked directly to the Registration paperclip and can be viewed from that location
by staff.
- Please note that attaching documents to the paperclip will cause the CPS database to grow
rapidly and may not be an ideal method for storing PDFs, especially if a customer has a
document management system.
- The default STANDARD_PDF_WITH_PM_ATTACHMENT output specification will cause each PDF loaded to the paperclip to be named "VSC File". There are two ways to change this.
- Edit the output specification and remove the line <document_name >VSC File</document_name>. This will cause the
paperclip name to be whatever you have named the template on the Template Management tab.
- Edit the output specification and change the line <document_name >VSC File<document_name> to
<document_name type="lookup">
{CUSTOM_PAPERCLIP_FILE_NAME}
</document_name>
. You will need to create a Property Override in each Template that uses this output specification using Visual Form Editor. The Property Override Name must match the lookup value you entered in the output specification. In this case, CUSTOM_PAPERCLIP_FILE_NAME. Then just type the name that you would like to appear in the paperclip for this template in the Property Override Value field.
-
-
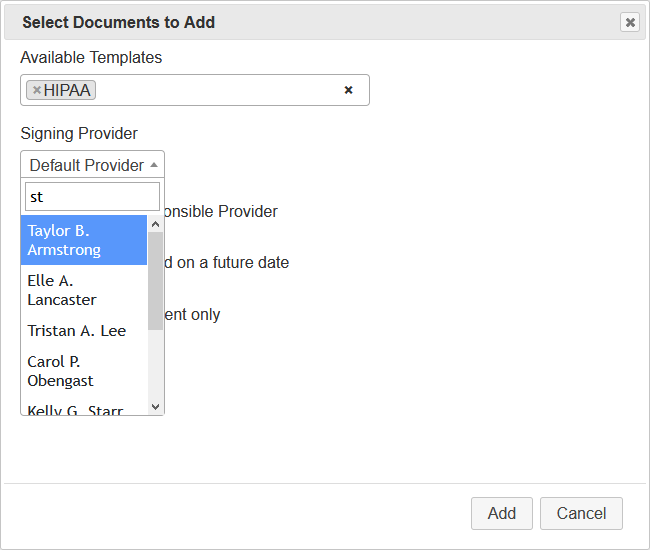
In VSC 3.X, when adding documents to a patient manually, there was no way to change the
signing provider (this could only be done via Structured Template Add rule). However in VSC
4.0, one can choose the Signing Provider (the Staff member whose desktop the document will
come to when imported into Centricity) for manually added documents. Note that for the
document to import properly the Signing Provider must have the privileges to sign the particular
document type being assigned. Default is still the Staff member assigning the document.
- Also, selecting the Template to add is slightly different than in VSC 3.X. Rather than having a
list of all available templates displayed and clicking the desired ones, one clicks in the box
below available templates and the list is displayed or one can begin typing the first letter or two
of the desired template and the names of templates starting with those letters will appear (Find
As You Type feature).
-
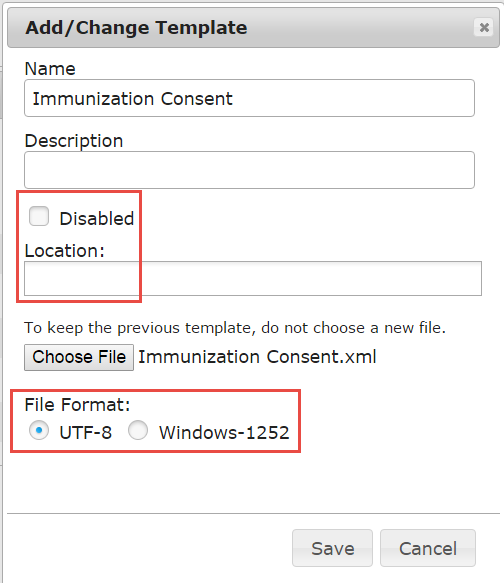
When one is signed in as the Site Administrator and adds a new document Template, the dialog
box has several new features:
- One can disable the template if it is not currently being used but the administrator does not want
to delete it.
- One can specify locations for the template. The template will then only be available to
providers signed in to VSC at those locations.
- One can specify a file format. This allows the use of Templates built with UTF-8 character
encoding (requires VFE 7.X or above). UTF-8 allows the use of additional characters for
expanded language support.
-
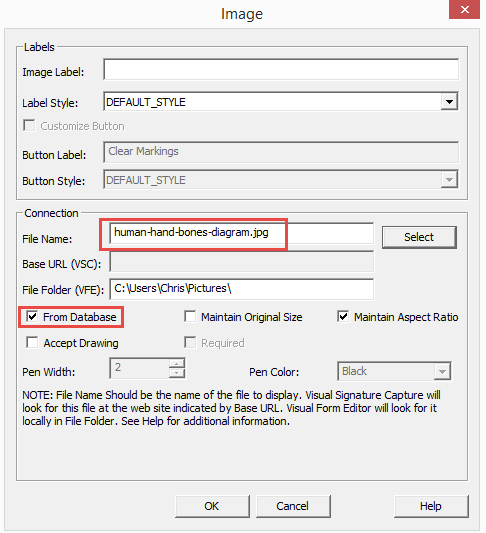
- In VSC 3.X, images could be displayed in templates, but the images needed to be located (and
retrieved from) an external URL. While that option still exists, in VSC 4.0, images can be
stored directly in the VSC database, eliminating the need to pull them from an external location.
- In order to take advantage of this new feature, one needs to build the template of interest using
VFE 8. When inserting an Image, select "From Database" and the
Base URL field will be grayed out. Then select the file of interest.
- Next, in VSC, sign in as the Site Administrator and go to the File Management tab. Make sure
that the Images radio button is selected. Click the Add Image button and then load the image
(with the same file name) that is going to be used in the template created above. You must load images before the templates that use them or you will receive an error message when loading the template. Once you load the image, you will be able to successfully load the template.
-
There are 6 new fields on the System Management tab:
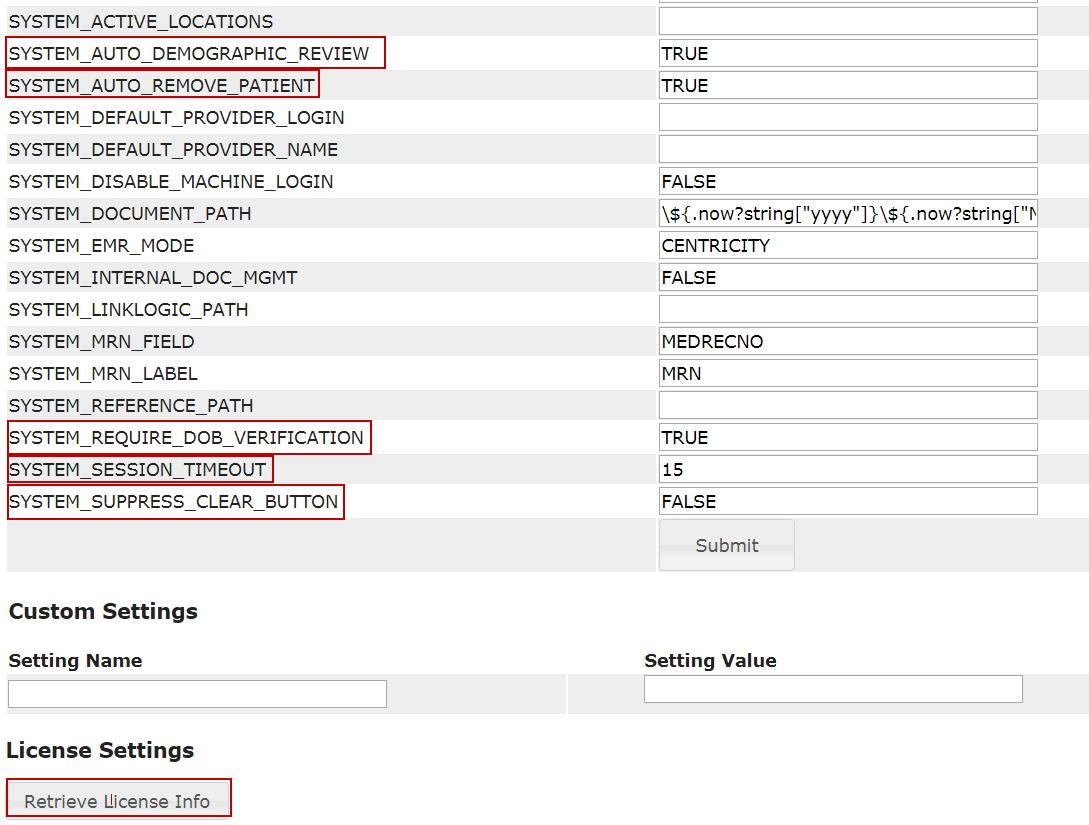
- SYSTEM_AUTO_DEMOGRAPHIC_REVIEW: The default setting is "TRUE", which means that when a document with patient demographics is completed and none of the demographic values have changed, the Reconciliation Management tab is skipped and the HL7 message is created and sent. "FALSE" means that even if there are no changes to the patient's demographics, staff must process the demographic information in the Reconciliation Management tab before the HL7 message is created and sent.
- SYSTEM_AUTO_REMOVE_PATIENT: The default setting is "TRUE", which means that a
patient's name is removed from the Document tab after they have completed all documents that
they were assigned, as in VSC 3.X. If this is field is set to "FALSE", patient will remain on the
Document tab after they have filled out all of their assigned documents. This will allow a
patient PIN to remain the same for an entire day. Setting
SYSTEM_AUTO_REMOVE_PATIENT to "FALSE" also means that the patient's name will
remain on the tablet after he/she has finished filling out documents. If
SYSTEM_AUTO_REMOVE_PATIENT is set to "FALSE" patients will eventually need to be
deleted from the Document tab manually or using a Delete All rule.
- SYSTEM_REQUIRE_DOB_VERIFICATION: Default value is "TRUE", which means that
VSC will ask the patient to input their Date of Birth (DOB) for secondary verification when the
patient home page is accessed, either via PIN or from Staff's "Patient View" button. If set to
"FALSE", patient DOB will not be required.
- SYSTEM_SESSION_TIMEOUT: This is the time, in minutes, before VSC "times out" on a
user. Standard value is 15 minutes, but values of up to 45 minutes can be entered. Note: Do
not set this value to 0 or the session will time out as soon as it starts, essentially locking the
user out of the system.
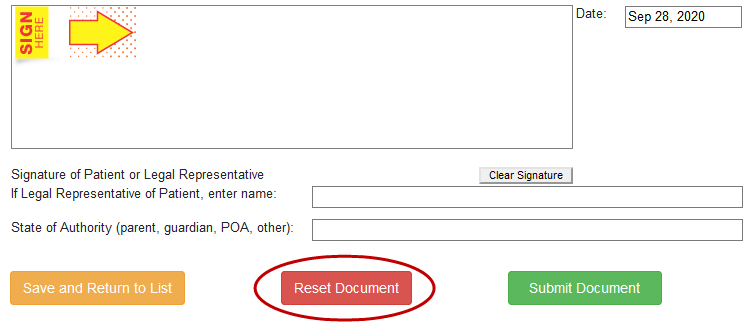
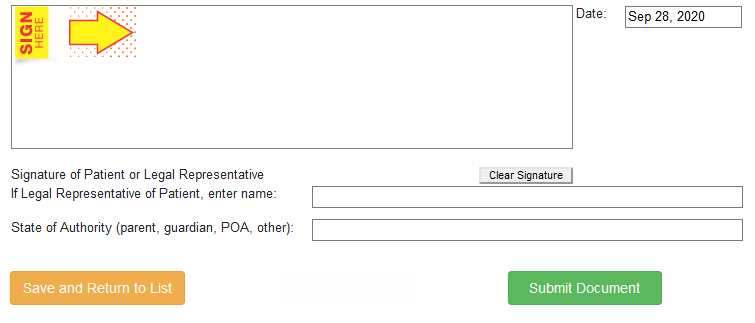
- SYSTEM_SUPPRESS_CLEAR_BUTTON: Default is "FALSE". If this field is set to
"TRUE", the Reset Document button is hidden. This prevents incidents where a patient
accidentally clicks that button and loses their data (although the patient would also have to
answer "Yes" to a confirmation message to lose their data accidentally).
- SYSTEM_SUPPRESS_CLEAR_BUTTON set to FALSE:
- SYSTEM_SUPPRESS_CLEAR_BUTTON set to TRUE (Reset Document hidden):
- Retrieve License Info button: Will grab the string that we use to generate a customer's VSC
license.
-
When a patient is filling out a document, it will auto save every 2 minutes to prevent loss of
patient's entries in case the software times out, the system crashes, or there is an error during
document submission.