Setting Up the Interface Between Visual Signature Capture and Centricity/athenaFlex EMRs
An interface between Visual Signature Capture
and Centricity/atheanaPractice/athenaFlow needs to be established before Visual Signature Capture is used. This interface will
allow LinkLogic or DTS to process HL7 messages,
thereby allowing importation of a signed document and related observation terms into the EMR.
- To set up the interface, you will need the following three files:
LISIGNATURE.IKT
LISIGNATURE.XRF
LISIGNATUREDOCTYPES.XRF
When Visual Signature capture is installed, the default location of these files
is: C:\Program Files\Logical Innovations\Visual Signature Capture\Interface.
- Copy the two .XRF files to the config\local folder of llogic where DTS is configured.
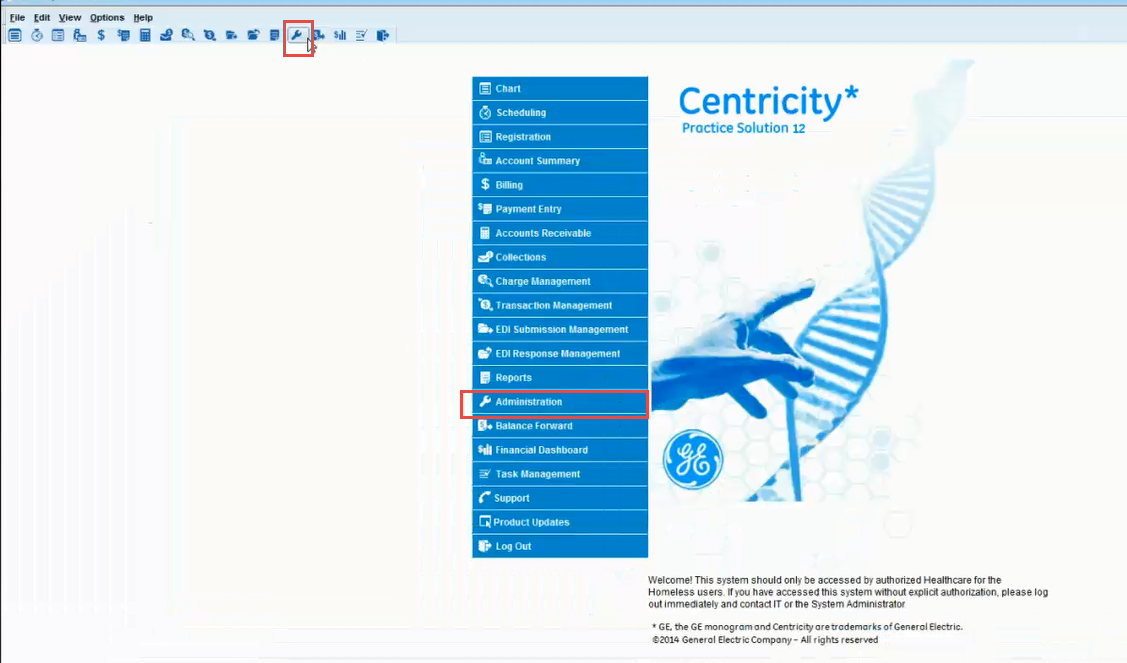
- Log in to the EMR.
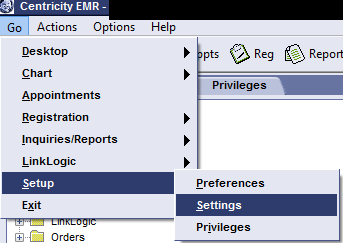
- For Centricity EMR/athenaFlow, on the upper left under Go, choose Setup → Settings. For CPS/athenaPractice, choose Administration → System.
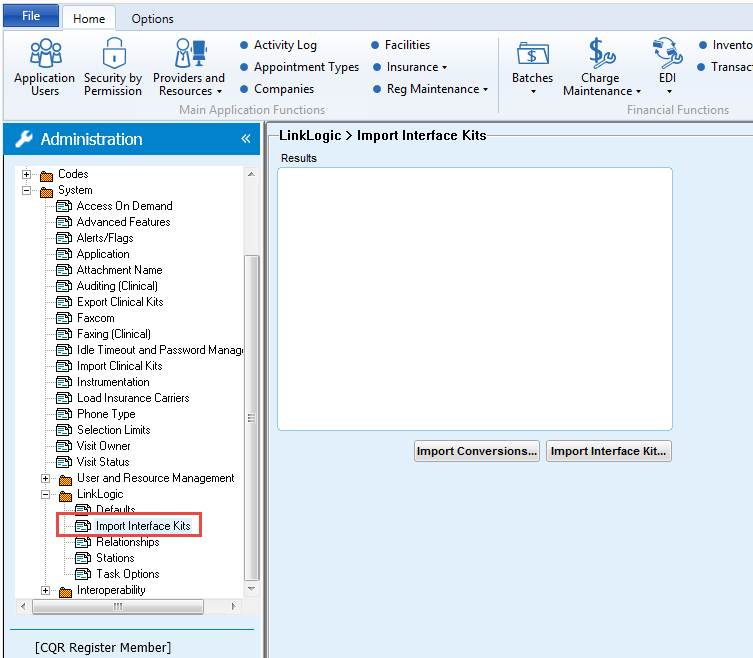
- On the left hand side, click the + next to the LinkLogic folder to expand it.
- Click on Import Interface Kits.
- Click the Import Interface Kit... button located to the right below the Results
box.
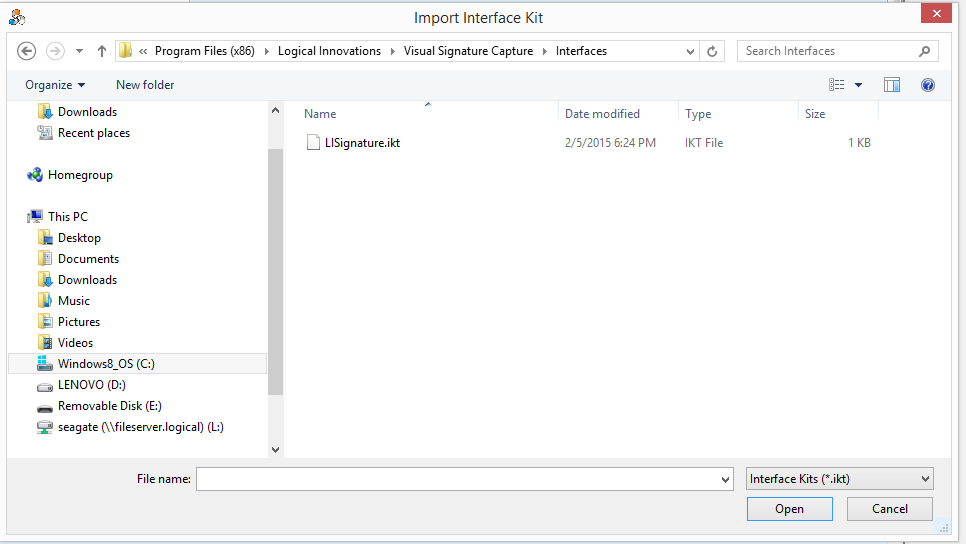
- Navigate to the LISIGNATURE.IKT.
- Highlight LISIGNATURE.IKT and click the Open button.
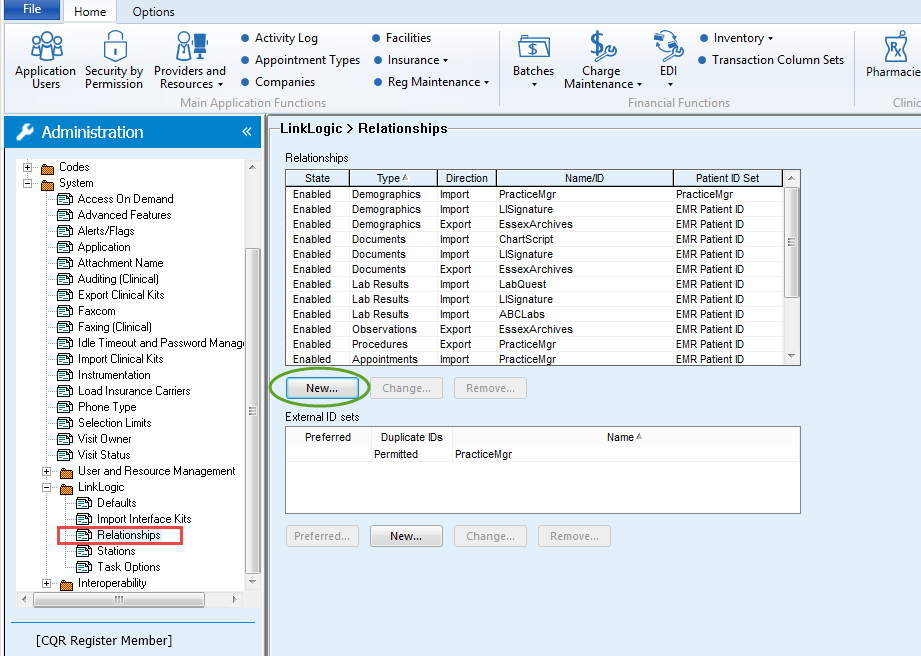
- Next Click on “Relationships” in the LinkLogic folder.
Click the button below the Relationships that says “New...”.
- In the New Relationship box that opens the Import radio button will be on.
Select Lab Results from the drop-down menu next to Type, HL7 for Format,
LiSignature for Unique Name/ID, LISignature Observation Import for the
Description and EMR Patient ID for the Patient ID Set. Then click OK.
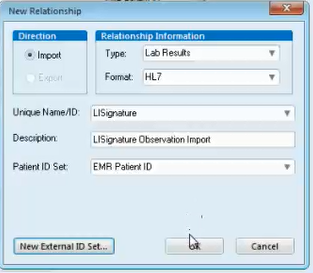
- Again Click the button below Relationships that says “New...”.
- In the New Relationship box that opens, the Import radio button will be on.
Select Documents from the drop-down menu next to Type and HL7 for the Format.
Enter LISignature for the Unique Name/ID and LISignature Documents Import for the
Description. Select EMR Patient ID for the Patient ID Set. Then click OK.
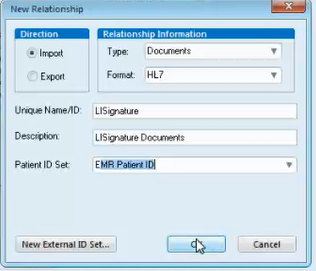
- Again Click the button below Relationships that says “New...”.
- In the New Relationship box that opens, the Import radio button will be on.
Select Demographics from the drop-down menu next to Type and HL7 for the Format.
Enter LISignature for the Unique Name/ID and LISignature Demographics Import for the
Description. Select EMR Patient ID for the Patient ID Set. Then click OK.
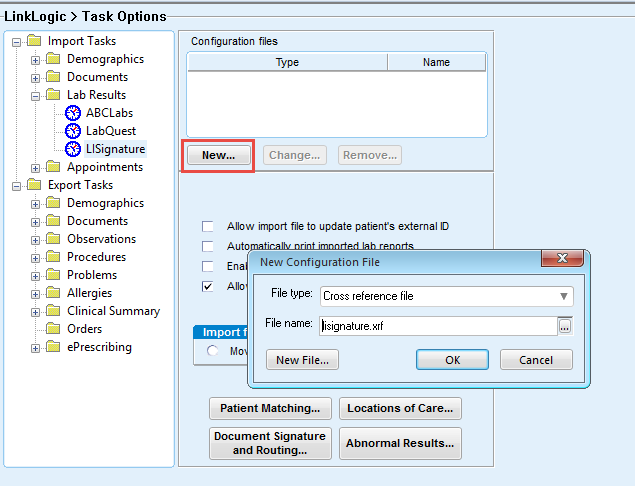
- Go back to the LinkLogic folder and click on Task Options.
- Expand the Lab Results folder and click on LiSignature.
- Click the New... button under Configuration files.
- In the New Configuration File box that opens, make sure that the file type is
“Cross reference file”. Click the … button to search for a file name and
select the LISIGNATURE.XRF file. Open it and then click OK.
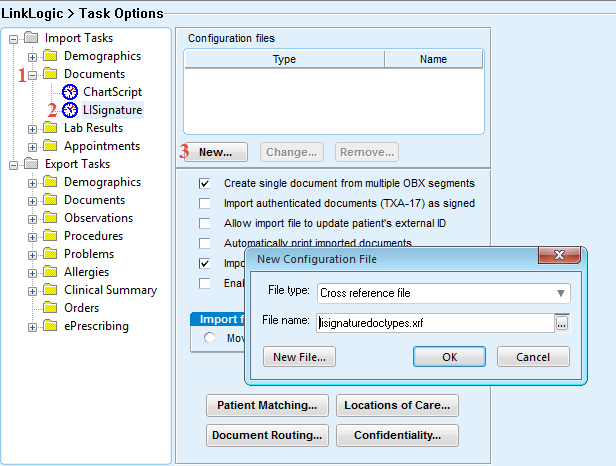
- Repeat steps 17 and 18, this time selecting the LISIGNATUREDOCTYPES.XRF file.
- Expand the Documents folder and then click on LiSignature.
- Click the New button under Configuration files.
- Make sure that the file type is “Cross reference file”. Click the … button
to search for a file name and select the LISIGNATUREDOCTYPES.XRF file.
Open it and then click OK.
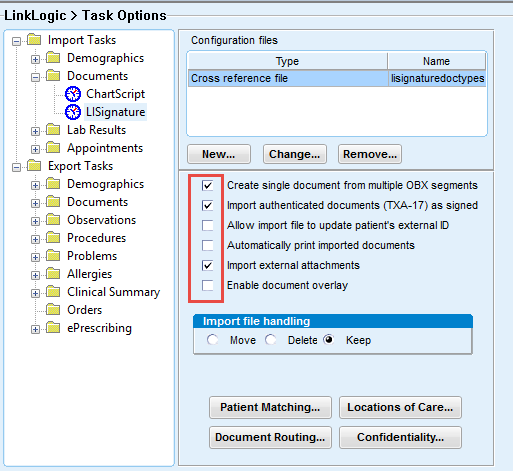
- Check the boxes next to Import external attachments and Import authenticated documents (TXA-17) as signed.
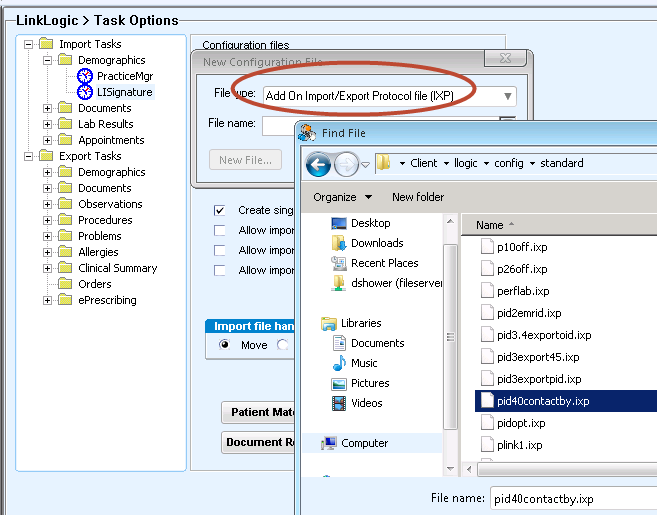
- Expand the Demographics folder and then click on LiSignature.
- Click the New button under Configuration files.
- Make sure that the file type is “Add On Import/Export Protocol file (IXP)”. Click the … button
to search for a file name. The current directory will likely be llogic\config\local. You will need to change the directory to llogic\config\standard and select the PID40CONTACTBY.IXP file.
Open it and then click OK.
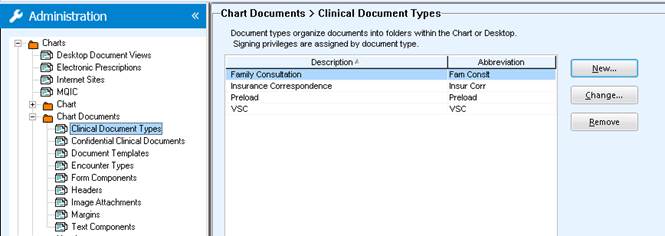
- The VSC default document must now be created. In CPS/atheanaPractice, this is found in Administration, Charts, Chart Documents, Clinical Document Types.
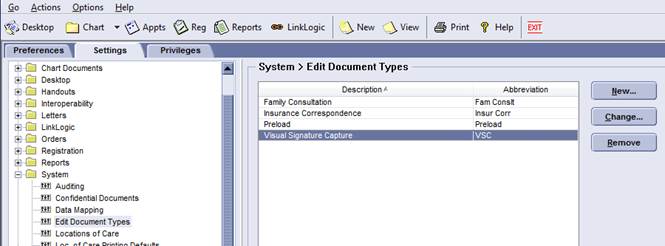
In Centricity EMR/athenaFlow, it is found under Go, Setup, Settings, System, Edit Document Types.
- Click New. The Document Type should be either VSC or Visual Signature Capture. The Abbreviation must be VSC.
- Give appropriate users the rights to sign the new VSC document type.
- In CPS/athenaPractice, this is found in Administration, System, User and Resource Management.
- In CEMR/athenaFlow, this is found in Go, Setup, Privileges. Expand the Document Signature folder.
Once the interface between Visual Signature Capture and the EMR has been set up, one needs
to go into Visual Signature Capture and indicate the location of the folders where the PDF and HL7
documents will get written to and read from.
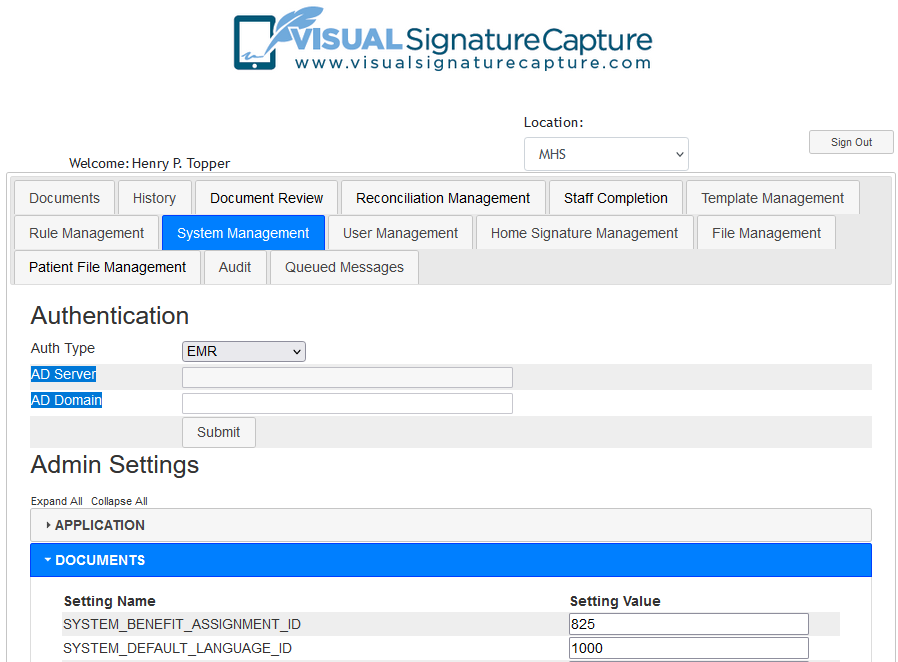
- In Visual Signature Capture, Sign in as
a Site Administrator.
- Click on the System Management Tab and expand the DOCUMENTS section.
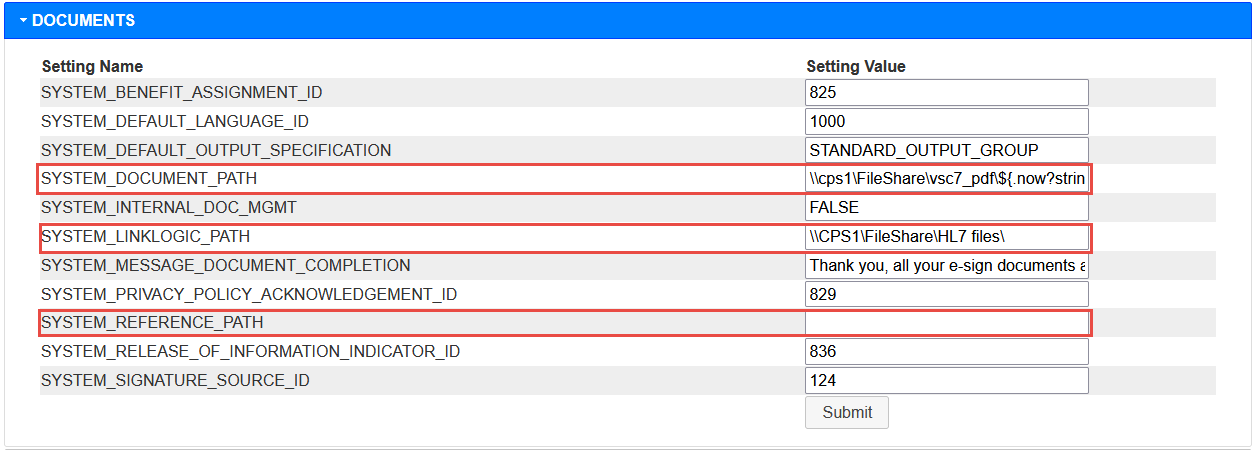
- Scroll down to SYSTEM_DOCUMENT_PATH and enter the location of the folder that document
PDFs generated by Visual Signature Capture will get written to. On a new installation, put this information in front of the code that is already there. It created the folder structure for the PDF.
- In the SYSTEM_REFERENCE_PATH field enter the location that the document PDFs will get read from,
followed by a trailing backslash. If this is the same as the SYSTEM_DOCUMENT_PATH, it may be left blank.
- In the SYSTEM_LINKLOGIC_PATH field enter the location of the folder that HL7 files will
get written to, followed by a trailing backslash.
- Click the Submit button at the bottom of the DOCUMENTS section to save the setting changes.