Rules
Rules have been revised significantly, both to provide a more informative overview of how the Rules are
set up/running, and also to accommodate home signing and the concept of future documents. The code underlying Rules has also
been rewritten. It is expected that Rules created prior to upgrading to VSC 7 should continue to function as they have done
in the past, but this should be verified.
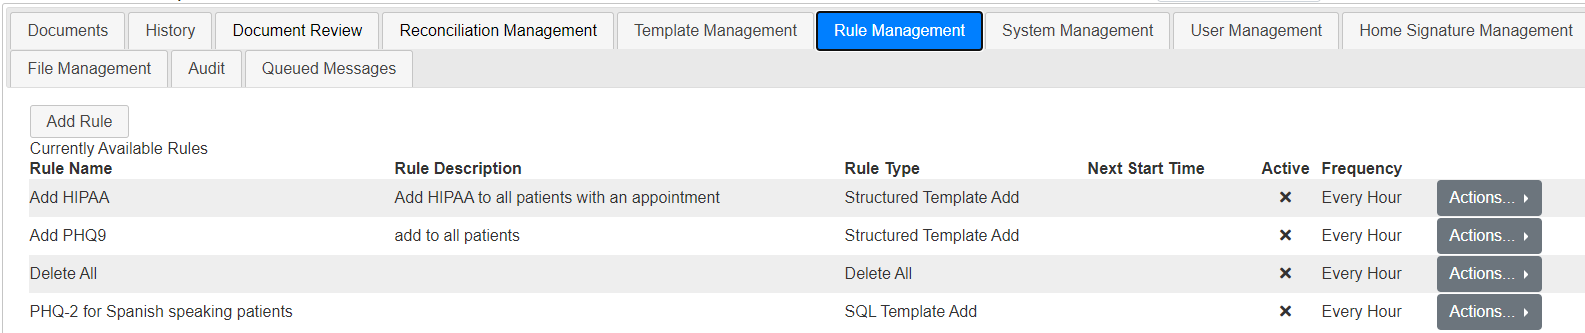
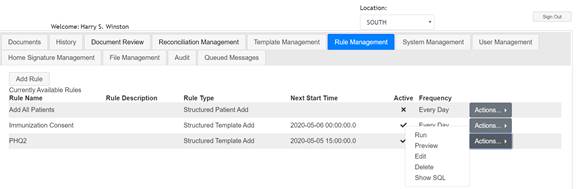
The tab overview now displays some information that could
previously only be seen by editing the Rule, such as how often a Rule is set to be run and whether or not the Rule is active.
Other actions, which were previously visible from the initial view have now been moved to a drop-down menu.

Setting up and executing rules
Rules can be set up by a Site Administrator to aid in managing
patients and templates in Visual Signature Capture.
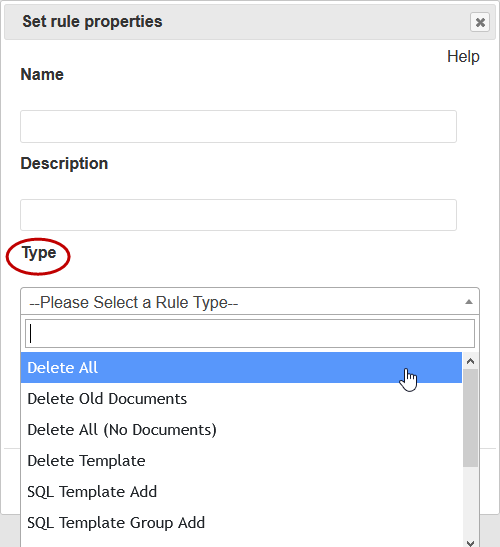
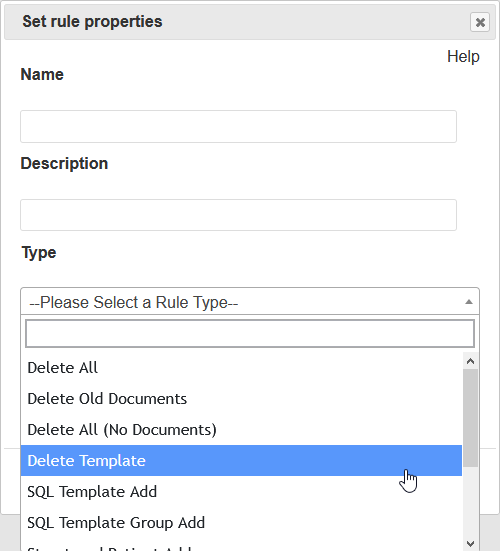
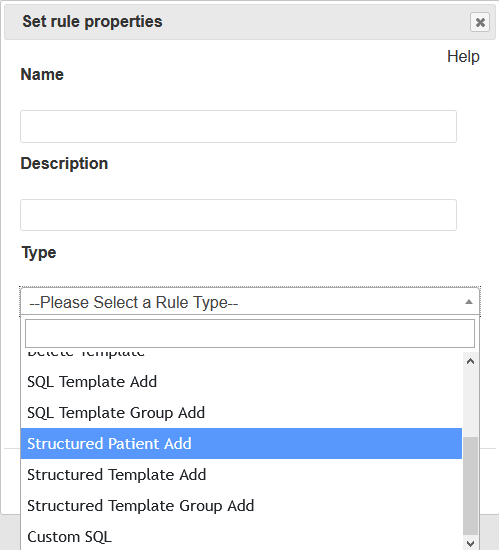
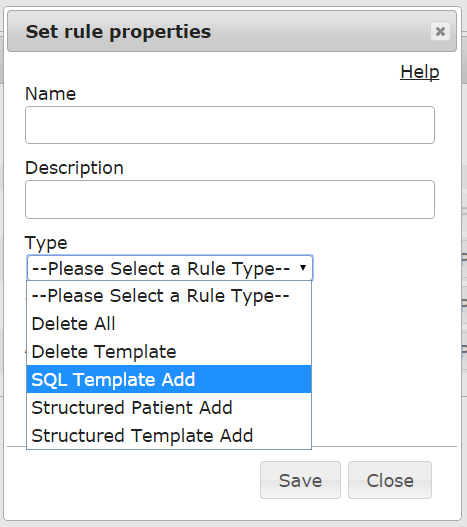
There are 10 types of rules: Delete All, Delete Old Documents, Delete All (No Documents), Delete Template, SQL Template Add, SQL Template Group Add,
Structured Patient Add, Structured Template Add, Structured Template Group Add, and Custom SQL.
Running Rules on Demand
When you have the System Management Setting SYTEM_RUN_RULE_ON_DEMAND set to TRUE, you will see an additional check box that says "Run on Demand" at the very bottom of the "Set rule properties" dialog boxes of the relevant rule types. This box must be checked when you want to run rules against a patient added manually.
Delete All Rule/Delete All (No Documents)
The Delete All Rule can be used to clear the Documents tab of patients and the unopened documents associated with these patients for all Staff members. Unopened documents show "Created on:" and a date. Opened documents show "Modified on:" and a date. One could
use this rule to clear Visual Signature Capture of patients and unopened documents
at the end of a day. Documents in Document Review and Reconciliation Management are not affected. The Delete All (No Documents) Rule will only clear patients from the Documents tab who have no documents associated with them.
- Sign in as a Site Administrator.
- Click on the Rule Management tab and then on the Add Rule button.
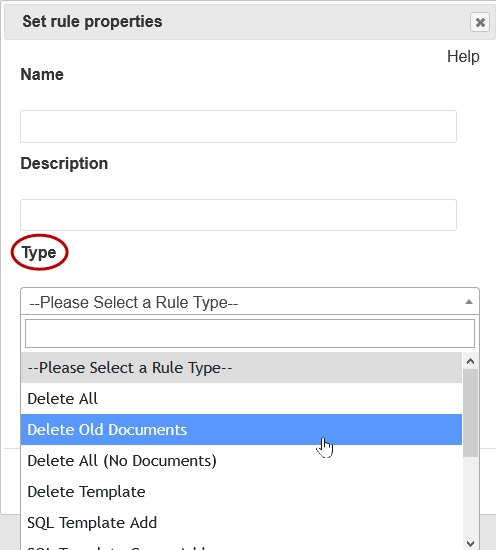
- In the Set Rule Properties dialog box that opens, select Delete All (or Delete All (No Documents)
from the Type drop-down menu.
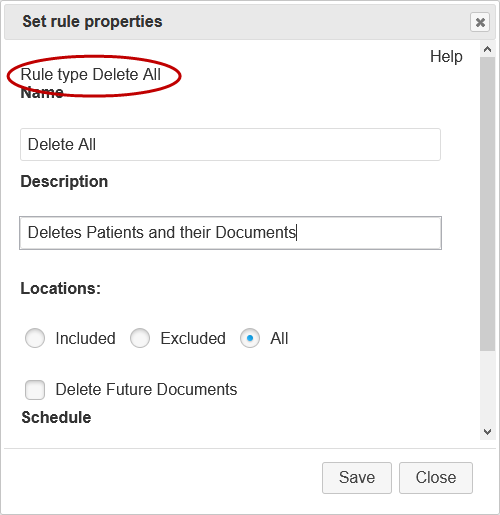
- The rule type is now shown at the top of the dialog box
(Delete All/Delete All (No Documents) and a name and description can be added in
the appropriate boxes.
- The rule can be set to run against all Locations of Care (All radio button and the default), certain Locations of Care (the Included radio button), or exclude certain Locations of Care (the Excluded radio button). You can add multiple locations. See this article to learn how to add multiple Locations at once or use the keyboard to add Locations. Locations of care are set by the relationship you have in the EMR between the Facility the appointment is scheduled in and the location. Visual Signature Capture assumes a one-to-one relationship between Facilities and Locations of Care. If a Facility is associated with more than one Location of Care, all of those Locations of Care will be affected by the rule.
- If you only want to be able to run the rule manually, click the
Save button without selecting a schedule. If you would like the rule
to be run at a regular interval, a schedule needs to be set. Note that
even if a schedule is selected, the rule can still be run manually.
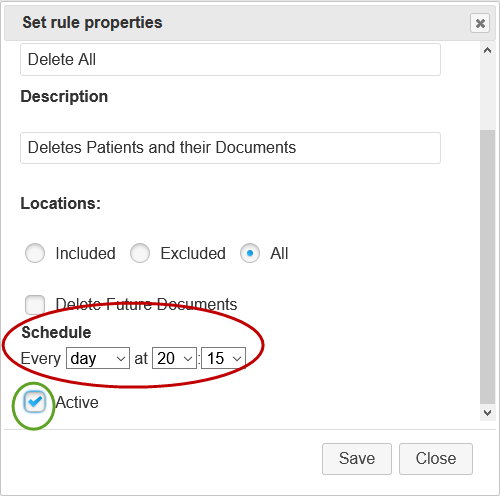
- To schedule the rule to be run on a regular basis, use the drop-down
menu next to the word Every, which allows you to choose to run the rule
every hour, every day or every week. It will also allow you to set the time:
minutes past the hour, if you chose every hour; hour and minutes, if you chose every
day; and, day, hour and minutes, if you chose every week.
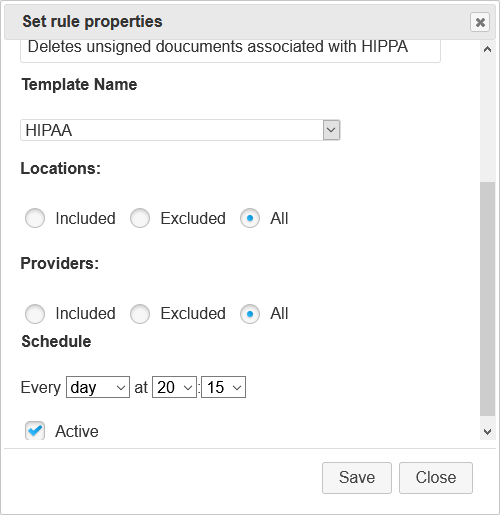
It is also necessary to check the box across from the word
"Active" in order for the rule to be run as scheduled. The Active check-box
allows the rule to be turned off or on. In the screenshot below,
the rule has been set to run every day at 20:15 (8:15 p.m.) and has been
activated.
- Click the Save button on the Set Rule Properties dialog box and the
rule will be displayed on the Rule Management tab. Since the rule is active, the Next Start Time column shows when the rule will next be executed.
- The Actions button to the right of the Delete All Rule
(see screenshot above) has 3 available options. The Run action runs the rule manually
and immediately, regardless of whether there is a schedule set or not.
Clicking the Run action will clear all patients and their associated
unopened documents from the Document tabs of all Locations of Care in the Visual
Signature Capture system and a message indicating that the rule has been
run will appear. The Edit action allows one to change the name or
description of the rule, change the schedule at which the rule will
be run, or use the check-box to toggle the rule between active and inactive.
Finally, the Delete action will delete the rule
if it is no longer needed.
Delete Old Documents Rule
The Delete Old Documents Rule can be used to clear the Documents tab of patients and the unopened documents associated with these patients that are older than the number of days you specify (with a maximum selection of 30 days and older) for all Staff members. The template will show "Created on:" and the date on the Documents tab. This is the date the rule looks at. If the document says "Modified on:", this rule will not delete the document. If all the documents of a patient are removed by this rule, the patient will also be removed. Documents in Document Review and Reconciliation Management are not affected.
- Sign in as a Site Administrator.
- Click on the Rule Management tab and then on the Add Rule button.
- In the Set Rule Properties dialog box that opens, select Delete All (or Delete All (No Documents)
from the Type drop-down menu.
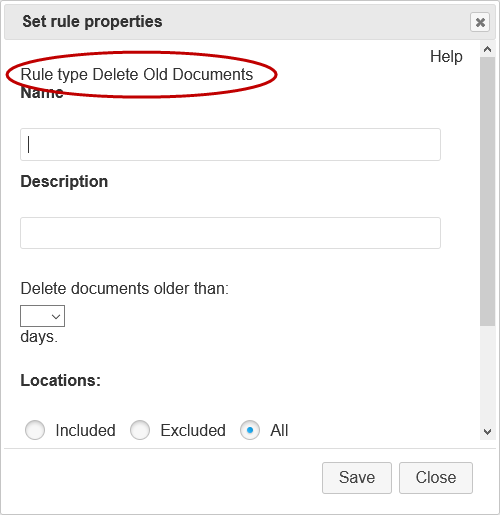
- The rule type is now shown at the top of the dialog box
(Delete All/Delete All (No Documents) and a name and description can be added in
the appropriate boxes.
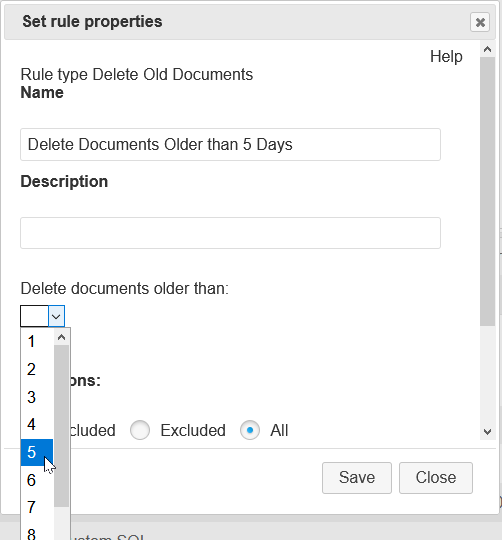
- Select a number from the Delete documents older than: drop-down. In this example, documents older than 5 days will be deleted.
- The rule can be set to run against all Locations of Care (All radio button and the default), certain Locations of Care (the Included radio button), or exclude certain Locations of Care (the Excluded radio button). Locations of care are set by the relationship you have in the EMR between the Facility the appointment is scheduled in and the location. Visual Signature Capture assumes a one-to-one relationship between Facilities and Locations of Care. If a Facility is associated with more than one Location of Care, all of those Locations of Care will be affected by the rule.
- If you only want to be able to run the rule manually, click the
Save button without selecting a schedule. If you would like the rule
to be run at a regular interval, a schedule needs to be set. Note that
even if a schedule is selected, the rule can still be run manually.
- To schedule the rule to be run on a regular basis, use the drop-down
menu next to the word Every, which allows you to choose to run the rule
every hour, every day or every week. It will also allow you to set the time:
minutes past the hour, if you chose every hour; hour and minutes, if you chose every
day; and, day, hour and minutes, if you chose every week.
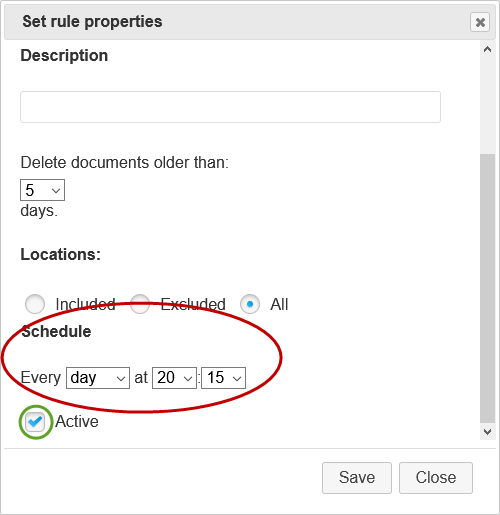
It is also necessary to check the box across from the word
"Active" in order for the rule to be run as scheduled. The Active check-box
allows the rule to be turned off or on. In the screenshot below,
the rule has been set to run every day at 20:15 (8:15 p.m.) and has been
activated.
- Click the Save button on the Set Rule Properties dialog box and the
rule will be displayed on the Rule Management tab. Since the rule is active, the Next Start Time column shows when the rule will next be executed.
- The Actions button to the right of the Delete All Rule
(see screenshot above) has 3 available options. The Run action runs the rule manually
and immediately, regardless of whether there is a schedule set or not.
Clicking the Run action will clear all patients and their associated
unopened documents from the Document tabs of all Locations of Care in the Visual
Signature Capture system and a message indicating that the rule has been
run will appear. The Edit action allows one to change the name or
description of the rule, change the schedule at which the rule will
be run, or use the check-box to toggle the rule between active and inactive.
Finally, the Delete action will delete the rule
if it is no longer needed.
Delete Template Rule
The Delete Template Rule can be used to delete the unopened documents associated
with a single template from patients in the Document tab. Unopened documents show "Created on:" and a date. Opened documents show "Modified on:" and a date. The template itself is not deleted from VSC. Signed documents are not deleted.
The document can be deleted from all patients that have been assigned it or
patients who have the document filtered by Location or provider. If this is the only template the patient has, the patient will be removed also.
- Sign in as a Site Administrator.
- Click on the Rule Management tab and then on the Add
Rule button.
- In the Set Rule Properties dialog box that opens, select Delete Template from
the Type drop-down menu.
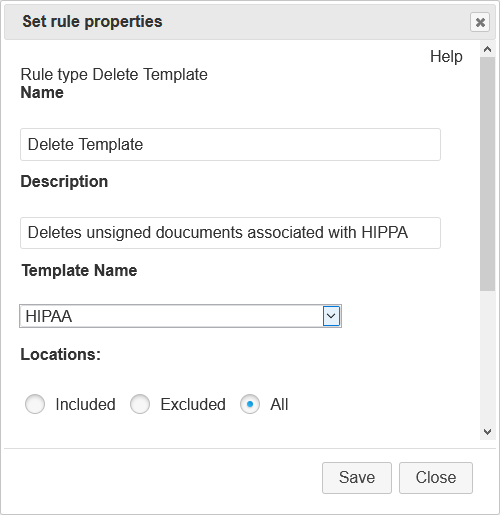
- The rule type is now shown at the top of the dialog box (Delete Template) and a
name and description can be added in the appropriate boxes. The template used to
assign the documents to be deleted must also be chosen. In the screenshot below,
the HIPAA document template has been chosen.
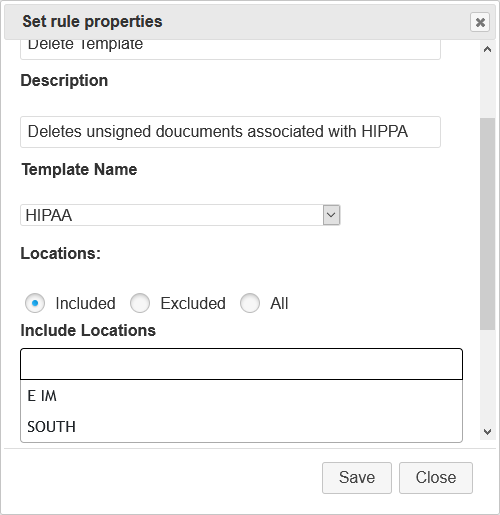
- The rule can be set to run against all Locations of Care (All radio button and the default), certain Locations of Care (the Included radio button), or exclude certain Locations of Care (the Excluded radio button). Click in the dialog to bring up the list of Locations. You can add multiple locations. See this article to learn how to add multiple Locations at once or use the keyboard to add Locations. Locations of care are set by the relationship you have in the EMR between the Facility the appointment is scheduled in and the location. Visual Signature Capture assumes a one-to-one relationship between Facilities and Locations of Care. If a Facility is associated with more than one Location of Care, all of those Locations of Care will be affected by the rule.
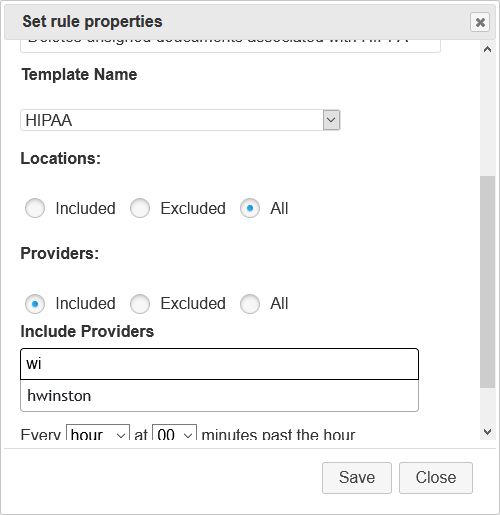
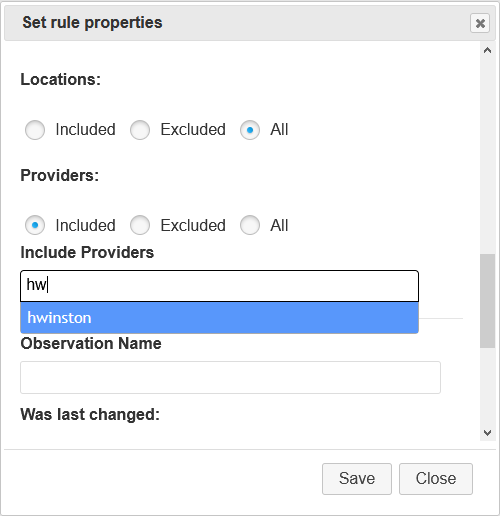
- If you further desire the list of patients to have the document associated with the
chosen template deleted can be filtered using Provider parameters. You may want to include
only certain providers. Select include or exclude and begin typing the provider you want to include
or exclude. A drop-down list will be created and can select the provider you want to include or
exclude. You can add multiple providers. See this article to learn how to add multiple providers at once or use the keyboard to add them. If you do not choose to include or exclude
any providers the rule will run on all templates regardless of provider.
- To schedule the rule to be run on a regular basis, use the drop-down
menu next to the word Every, which allows you to choose to run the rule
every hour, every day or every week. It will also allow you to set the time:
minutes past the hour, if you chose every hour; hour and minutes, if you chose every
day; and, day, hour and minutes, if you chose every week.
It is also necessary to check the box across from the word
"Active" in order for the rule to be run as scheduled. The Active check-box
allows the rule to be turned off or on. In the screenshot below,
the rule has been set to run every day at 20:15 (8:15 p.m.) and has been
activated.
- Click the Save button on the Set Rule Properties dialog box and the rule is now shown
on the Rule Management tab in the list of currently available rules.
- The Actions button to the right of the Delete All Rule (see screenshot above) has 3 available options. The Run action runs the rule manually and immediately, regardless of whether there is a schedule set or not. Clicking the Run action will clear the
unopened HIPPA documents from the Document tabs of all Locations of Care in the Visual
Signature Capture system and a message indicating that the rule has been
run will appear. The Edit action allows one to change the name or
description of the rule, change the schedule at which the rule will
be run, or use the check-box to toggle the rule between active and inactive.
Finally, the Delete action will delete the rule
if it is no longer needed.
Structured Patient Add Rule
The Structured Patient Add rule can be used to add Patients who have appointments to the Visual Signature Capture Document Tab. All patients
with appointments scheduled can be added or the list of patients can be specified based on
location, provider, or date. This rule allows for more rapid addition of patients to the
Document tab than is possible when patients are added manually.
- Sign in as a Site Administrator.
- Click on the Rule Management tab and then on the Add
Rule button.
- In the Set Rule Properties dialog box that opens, select Structured Patient Add
from the Type drop-down menu.
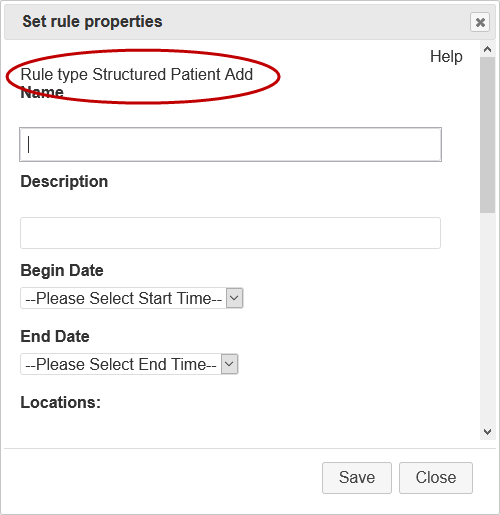
- The rule type is now shown at the top of the dialog box (Structured Patient Add)
and a name and description can be added in the appropriate boxes.
- Setting the Date tells Visual Signature Capture the time frame of appointments to look at.
This determines the patients that will be added to the Documents tab.
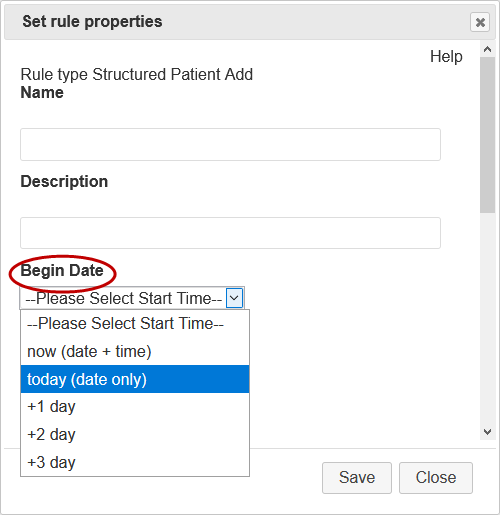
- Set the starting date using the Begin Date drop-down menu in the Set Rule
Properties Dialog Box. The first two options are:
“Now”, which looks at the appointments starting at the date and
time the rule executes; and “Today”, which will look at all appointments on the current day without
taking the rule execution time into account. “Now” will only add patients
that have appointments equal to or later than the current time when the rule executes, while
“Today” adds all patients that have appointments on the current day, regardless
of whether the appointment time has already passed or not. The options +1 through +
3 days are also available as start times. +1 day will look at all the appointments on the
following day. +2 day and +3 day start
looking at appointments 2 days and 3 days in the future respectively.
If no Begin Date value is chosen,
Visual Signature Capture uses “Now” as a default value.
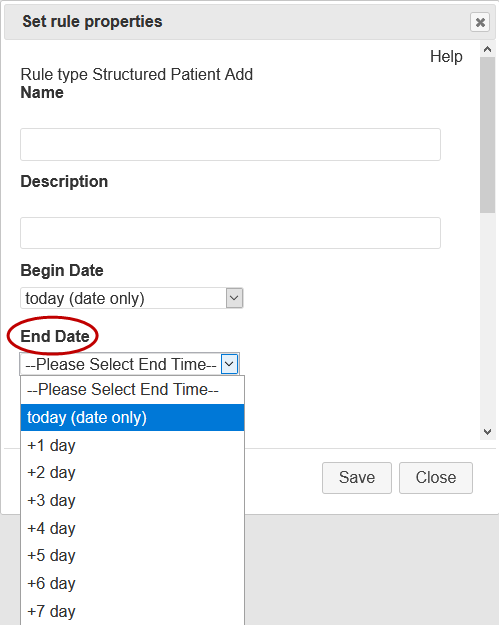
- Set the end date using the End Date drop-down menu.
The end date tells Visual Signature Capture when to stop looking at
appointments. The options are "Today" and +1 day through +7 day.
The meaning of these terms is the same as described above for the Start Date with
+4 through +7 day continuing the same pattern described for +1 through +3 days. If no End Date is selected,
Visual Signature capture uses "Today" as the default.
Setting "Now" as the Begin Date and "Today" as the End Date adds all the patients with appointments
equal to or later than the current time of day when the rule executes. Setting Start Date and End Date both to "Today" will
add all the patients to the Document tab regardless of whether the appointment time has passed or not.
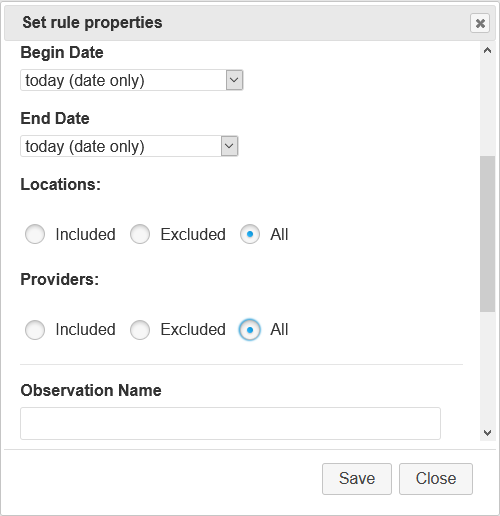
- The list of patients to be added to the Documents tab can be filtered
using Location and Provider parameters. Using the appropriate fields
in the Set Rule Properties Dialog box (located below the Date settings,
see screenshot below), locations and providers can be included or excluded. If no providers are included or excluded, all providers will be included by default. The rule can be set to run against all Locations of Care (All radio button and the default), certain Locations of Care (the Included radio button), or exclude certain Locations of Care (the Excluded radio button). Locations of care are set by the relationship you have in the EMR between the Facility the appointment is scheduled in and the location. Visual Signature Capture assumes a one-to-one relationship between Facilities and Locations of Care. If a Facility is associated with more than one Location of Care, all of those Locations of Care will be affected by the rule. You can add multiple locations or providers. See this article to learn how to add multiple items at once or use the keyboard to add multiple items.
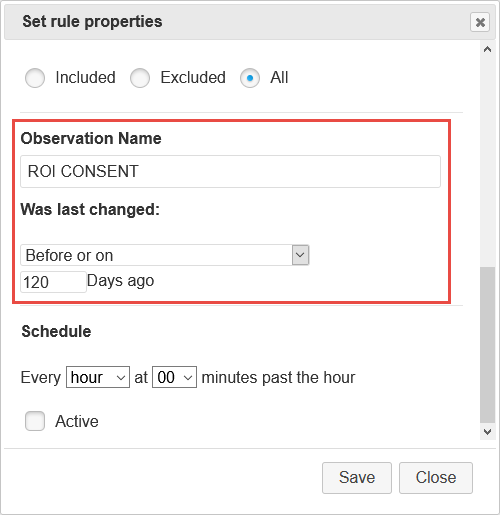
- One can also filter the list of patients to be added to the Document tab based on an Observation
Term from the database. While one can filter based on any Observation Term, it is
envisioned that one may use this feature to filter out patients who have recently signed a
particular document. An example is a patient that has signed a consent form, and doesn't need to
sign it again until a certain period of time has passed. In the screenshot below, patients
who have signed a HIPAA release of information form within the past year will be filtered
out using the relevant Observation Term “ROI CONSENT”. The Search conditionals that are possible
are: Before, Before or on, After, and After or on. The Observation Name feature is often used to add patients who have
not completed an action within the last x days. Most searches will be done using the Before or Before or on options.
Before or Before or on would mean that if the most recent Observation is dated before today less the number of
"Days ago" entered, the patient will be added. For example, if the "Days ago" is 120 and the selection is Before or on,
any patient who had the Observation Term last populated over 3 months ago would be added. If the value for a patient
is null for a particular Observation Name (the Observation has never been recorded), the patient
will be always be added.
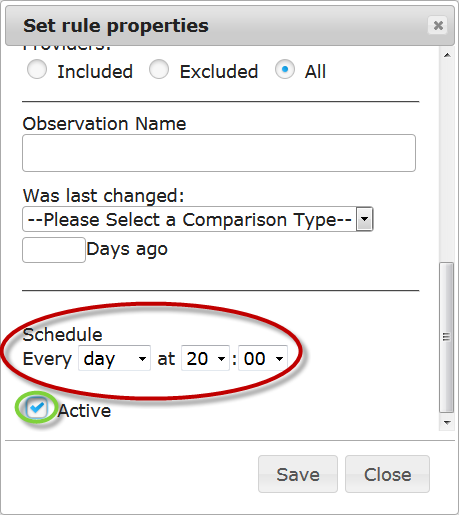
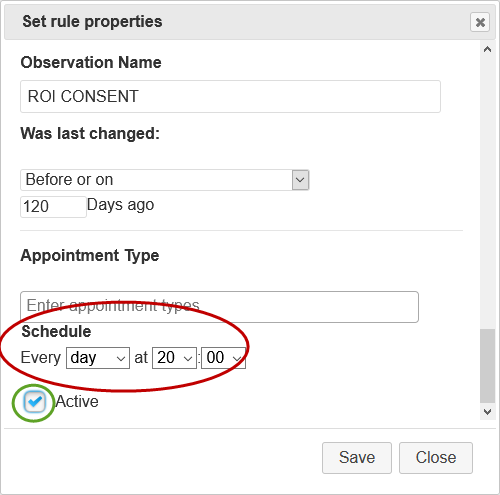
- Scheduling the Structured Patient Add Rule determines the time of day that the rule will be run. If no schedule is set, the rule can only be run manually (see below). If a schedule is set, the rule can still be run manually. To set the schedule, scroll to the very bottom of the Set Rule Properties dialog box. Underneath the word “Schedule” is a drop-down box which allows you to choose to run the rule every hour, every day or every week. It will also allow you to set the time: minutes past the hour, if you chose every hour; hour and minutes, if you chose every day; and, day, hour and minutes, if you chose every week. It is also necessary to check the box across from the word "Active" in order for the rule to be run as scheduled. The Active check-box allows the rule to be turned off or on. In the screenshot below, the rule has been set to run every day at 20:00 (8:00 p.m.) and has been activated. Once
day or week is chosen, a time field will appear that allows one to
select the time of day that the rule will be run (and day of the week
if one chooses to run the rule weekly). It is also necessary to check
the box across from the word "Active" in order for the rule to be run as
scheduled. The Active check-box allows the rule to be turned off or on.
In the screenshot below, the rule has been set to run every day at 20:00
(8 p.m.) and has been activated.
- Click the Save button at the bottom of the Set Rule Properties dialog box and the rule
will be displayed on the Rule Management tab in the list of currently available rules.
- There are five available Actions to the right of the Structured Patient Add Rule (see screenshot above).
- The Run action runs the rule manually and immediately, updating the patients in
the Document tab based on appointments regardless of whether there
is a schedule set or not. All other parameters (Begin Date, End Date, locations
included or excluded, and providers included or excluded) are taken into account
when the rule is run manually.
- The Preview action shows the list of Patients that will be added to
the Documents Tab of Staff members based on the parameters that have been
set for the rule. To return from this view to the list of currently available
rules, click on the Show Rule List button. Beginning in version 5.x, the Location and Provider are shown. This indicates who will "own" the document in the EMR and the Location of Care that document will have
- The Edit action opens the Set Rule Properties dialog box and allows
one to modify any of the parameters
(rule name, description, begin date, end date, location, provider, observation term, schedule) described above.
- The Delete action is present in order to delete a rule that is no longer needed.
- The Show SQL action displays the SQL query that is used to execute the rule.
Structured Template Add/Structured Template Group Add Rule
The Structured Template Add Rule adds patients to the Document tab based on appointments. In addition, it adds a document to those patients based on a template
that is chosen. This rule could be used if there is a document that all patients with
appointments for the day should sign. Like the Structured Patient Add Rule, all patients
with appointments scheduled can be added or the list of patients can be specified based
on location, provider, or date. This rule allows for more rapid addition of patients to
the Document tab than is possible when patients are added manually. The Structured Template Group Add Rule gives you the option to choose a Template Group instead of a single Template for the Rule to add to patients.
- Sign in as a Site Administrator.
- Click on the Rule Management tab and then on the Add
Rule button.
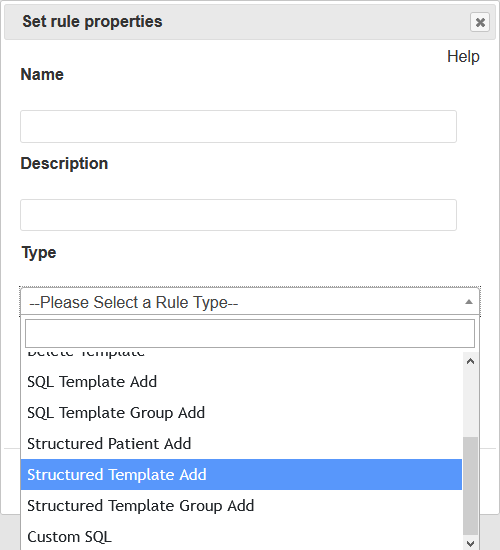
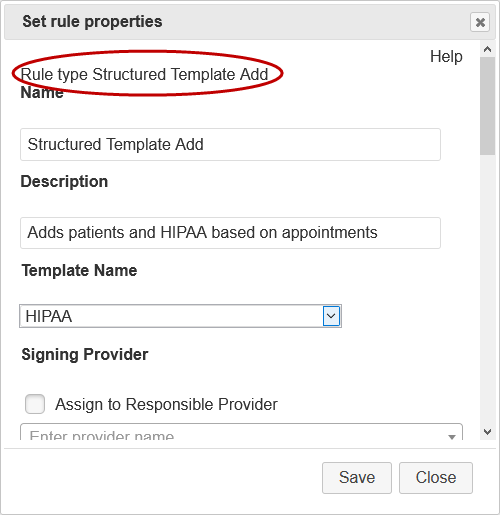
- In the Set Rule Properties dialog box that opens, select Structured Template Add/Structured Template Group Add
from the Type drop-down menu.
- The rule type is now shown at the top of the dialog box (Structured Template Add/Structured Template Group Add) and a name
and description can be added in the appropriate boxes.
- Next the Template or Template Group that will be used to assign the document to patients is selected.
This is chosen from a Template Name/Group drop-down menu located below the description field.
The drop-down menu lists all of the available Templates or Groups and the user can choose only one;
the Structured Template Add rule does not allow the addition of multiple documents where the Structured Template Group Add rule does via the predefined group of Templates.
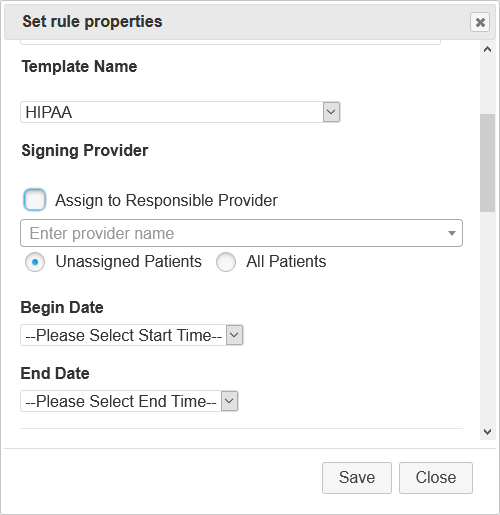
In the screenshot above, the HIPAA template has been chosen.
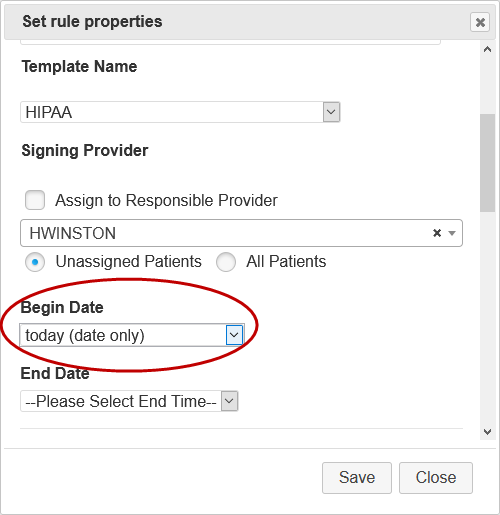
- In versions prior to 5.x, a Signing Provider was optional. Now, a Signing Provider must be chosen. This field is located below the
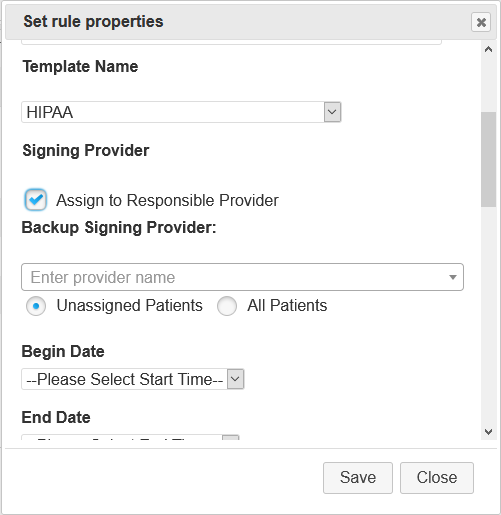
Template Name field (see screenshot below). The staff member who the patient has the appointment with will be the signing provider by default. This Signing Provider is a backup if the appointment is with a resource or billing provider and not an actual EMR user and the Unassigned Patients radio button is checked. If the All Patients radio button is selected, this provider will be used regardless of the appointment information. There are two options, Assign to Responsible Provider and a box with Enter provider name. Assign to Responsible Provider will make the patient's Responsible provider the owner of the chart document if the appointment is with a non-EMR user entity.
If you choose Responsible Provider, you will see a Backup Signing Provider entry appear. This is to specify an EMR user to own the document in case there is no Responsible Provider assigned to the patient.
The second option to Enter provider name functions similar to the Backup Signing Provider, as it is used when the appointment is with a resource or billing provider and not an actual EMR user
- Setting the Date tells Visual Signature Capture the window of appointments to look at.
This determines the patients that will be added to the Documents tab.
- Set the starting date using the Begin Date drop-down menu in the Set Rule
Properties Dialog Box. The first two options are:
“Now”, which looks at the appointment book starting at the current date and
time; and “Today”, which will look at all appointments on the current day without
taking time into account. “Now” will only add patients
that have appointments equal to or later than the current time, while
“Today” adds all patients that have appointments on the current day, regardless
of whether the time has already passed or not. The options +1 through +
3 days are also available as start times. +1 day will look at all the appointments on the
following day. +2 day and +3 day start
looking at appointments 2 days and 3 days in the future respectively.
If no Begin Date value is chosen,
Visual Signature Capture uses “Now” as a default value.
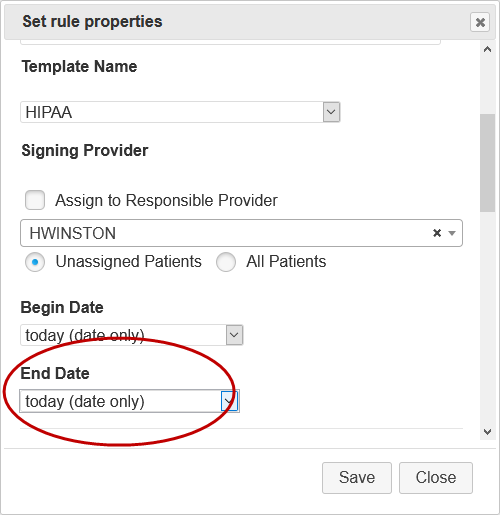
- Set the end date using the End Date drop-down menu.
The end date tells Visual Signature Capture when to stop looking at
appointments. The options are "Today" and +1 day through +7 day.
The meaning of these terms is the same as described above for the Start Date with
+4 through +7 day continuing the same pattern described for +1 through +3 days. If no End Date is selected,
Visual Signature capture uses "Today" as the default.
Setting "Now" as the Begin Date and "Today" as the End Date adds all the patients with appointments
equal to or later than the current time of day. Setting Start date and End Date both to "Today" will
add all the patients to the Document tab regardless of whether the appointment time has passed or not.
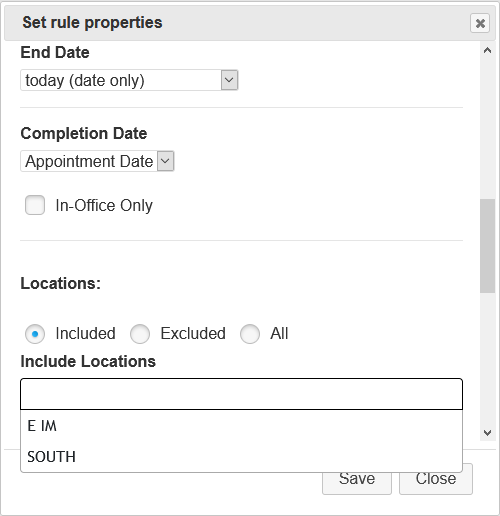
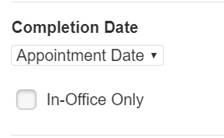
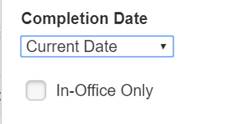
- In order to accommodate Home Signatures, the ability has been added to choose a "Completion Date", which can be the Appointment Date or the Current Date. "Current Date" means that the document is due on the day that the Rule is run, and that is the way Rules prior to VSC 7 worked. The "Appointment Date" means that the document completion date will be the date of the patient's next appointment, and is the default choice for new Rules going forward. Documents added by a Rule can also be "In-Office Only" if that box is selected. This means that the patient will not be able to see this document via the URL's related to Home Signature Management. It will only show via the URL that VSC using for staff login and the URL that has only the PIN login available. Rules created prior to upgrading to VSC 7 will be set as "Current Date" and will not be designated as In-Office Only.
- The list of patients to be added to the Documents tab can be filtered
using Location and Provider parameters. Using the appropriate fields
in the Set Rule Properties Dialog box (located below the Date settings,
see screenshot below), locations and providers can be included or excluded. The rule can be set to run against all Locations of Care (All radio button and the default), certain Locations of Care (the Included radio button), or exclude certain Locations of Care (the Excluded radio button). You can add multiple locations. See this article to learn how to add multiple Locations at once or use the keyboard to add Locations. Locations of care are set by the relationship you have in the EMR between the Facility the appointment is scheduled in and the location. Visual Signature Capture assumes a one-to-one relationship between Facilities and Locations of Care. If a Facility is associated with more than one Location of Care, all of those Locations of Care will be affected by the rule.
- If you further desire the list of patients to have the document associated with the
chosen template deleted can be filtered using Provider parameters. You may want to include
only certain providers. Select include or exclude and begin typing the provider you want to include
or exclude. A drop-down list will be created and can select the provider you want to include or
exclude. You can add multiple providers. See this article to learn how to add multiple providers at once or use the keyboard to add them. If you do not choose to include or exclude
any locations the rule will run on all templates regardless of location.
- One can also filter the list of patients to be added to the Document tab based on an Observation
Term from the database. While one can filter based on any Observation Term, it is
envisioned that one may use this feature to filter out patients who have recently signed a
particular document. An example is a patient that has signed a consent form, and doesn't need to
sign it again until a certain period of time has passed. In the screenshot below, patients
who have signed a HIPAA release of information form within the past year will be filtered
out using the relevant Observation Term “ROI CONSENT”. The Search conditionals that are possible
are: Before, Before or on, After, and After or on. The Observation Name feature is often used to add patients who have
not completed an action within the last x days. Most searches will be done using the Before or Before or on options.
Before or Before or on would mean that if the most recent Observation is dated before today less the number of
"Days ago" entered, the patient will be added. For example, if the "Days ago" is 120 and the selEction is Before or on,
any patient who had the Observation Term last populated over 3 months ago would be added. If the value for a patient
is null for a particular Observation Name (the Observation has never been recorded), the patient
will be always be added.
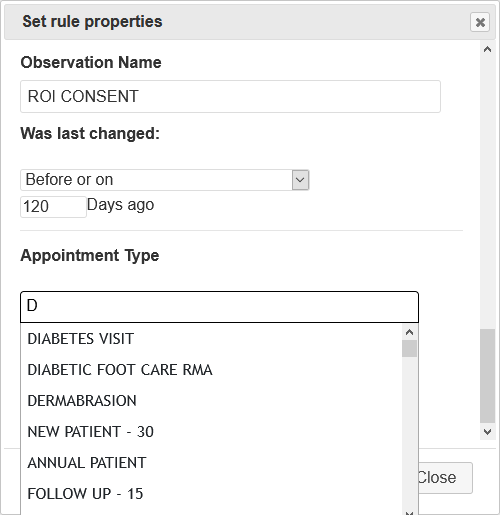
-
The patients can additionally be filtered by Appointment Type. You can set one or more Appointment Types so that if the patient's appointment type matches this filter, they will receive this document. Type at least one letter in the Appointment Type dialog to bring up a list. You can add multiple Appointment Types. See this article to learn how to add multiple Appointment Types at once or use the keyboard to them. If no Appointment Type is selected it will be ignored.
- Scheduling the Structured Template Add Rule determines the time of day that the rule will be run. If no schedule is set, the rule can only be run manually (see below). If a schedule is set, the rule can still be run manually. To set the schedule, scroll to the very bottom of the Set Rule Properties dialog box. Underneath the word “Schedule” is a drop-down box which allows you to choose to run the rule every hour, every day or every week. It will also allow you to set the time: minutes past the hour, if you chose every hour; hour and minutes, if you chose every day; and, day, hour and minutes, if you chose every week. It is also necessary to check the box across from the word "Active" in order for the rule to be run as scheduled. The Active check-box allows the rule to be turned off or on.
In the screenshot below, the rule has been set to run every day at 20:00
(8 p.m.) and has been activated.
- Once all parameters have been set, click the Save button at the bottom of the Set Rule properties
dialog box and the rule will be added to the Rule Management Tab under the list of currently available
rules.
- There are five available Actions to the right of the Structured Patient Add Rule (see screenshot above).
- The Run action runs the rule manually and immediately, updating the patients in
the Document tab based on appointments regardless of whether there
is a schedule set or not. All other parameters (Begin Date, End Date, locations
included or excluded, and providers included or excluded) are taken into account
when the rule is run manually.
- The Preview action shows the list of Patients that will be added to
the Documents Tab of Staff members based on the parameters that have been
set for the rule. To return from this view to the list of currently available
rules, click on the Show Rule List button. Beginning in version 5.x, the Location and Provider are shown. This indicates who will "own" the document in the EMR and the Location of Care that document will have
- The Edit action opens the Set Rule Properties dialog box and allows
one to modify any of the parameters
(rule name, description, begin date, end date, location, provider, observation term, schedule) described above.
- The Delete action is present in order to delete a rule that is no longer needed.
- The Show SQL action displays the SQL query that is used to execute the rule.
SQL Template Add/SQL Template Group Add Rule
The SQL Template Add Rule allows a user to write a customized SQL query
to select a particular set of patients to add to the Document tab. These
patients will be assigned a document based on the Template that is chosen
for the rule. The SQL Template Group Add Rule allows a predefined group of Templates to be assigned to the patients.
- Sign in as a Site Administrator.
- Click on the Rule Management tab and then on the Add
Rule button.
- In the Set Rule Properties dialog box that opens, select SQL Template
Add/SQL Template Group Add from the Type drop-down menu.
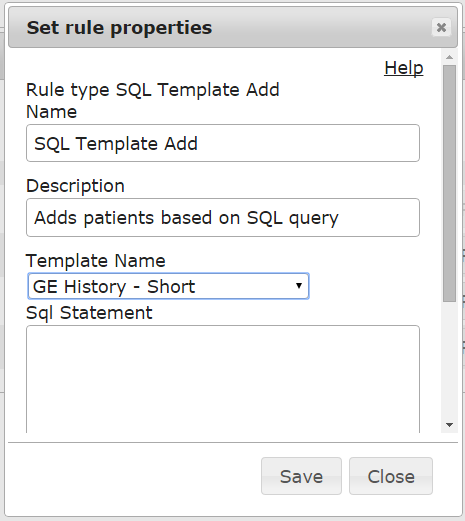
- The rule type is now shown at the top of the dialog box (SQL Template Add/SQL Template Group Add)
and a name and description can be added in the appropriate boxes.
-
Choose the
Template/Template Group that will be used to assign the document
to patients. This is chosen from a Template Name/Template Group drop-down menu
located below the description field. The drop-down menu lists all
of the available Templates or Template Groups and the user can choose only one; the SQL
Template Add rule does not allow the addition of multiple documents.
The SQL Template Group Add rule does all multiple Templates to be added via predefined Template Groups. In the screenshot above, the GE History Short template has been chosen.
- Next add the SQL statement that will be used to run the query.
The Select clause of the SQL statement must contain the columns shown
in the table below. Examples of each data type are shown below the column names.
| PatientUniqueEmrId |
SearchName |
birthdate |
sex |
MedicalRecordNumber |
pvid |
loginname |
Location |
Locationid |
| 1225794135051060 |
YOSHIDA, MARY O. |
14-MAR-57 |
F |
MR-000-081 |
1225652472001060 |
hwinston |
SOUTH |
1225648184001060 |
| 1239638219050620 |
INISHI, ROBERT S. |
17-SEP-41 |
M |
MR-295-742 |
1225652472001060 |
hwinston |
SOUTH |
1225648184001060 |
The following is an example of the select clause for a SQL query of an Oracle
or a Microsoft SQL database:
select distinct person.pid as PatientUniqueEmrId, person.SearchName,
person.DATEOFBIRTH as Birthdate, person.sex, person.MEDRECNO as MedicalRecordNumber,
usrinfo.pvid, usrinfo.loginname, locreg.abbrevname as Location, locreg.locid as LocationId from …
- To set the completion date to the appointment date, include in the Select “Appointments.EmrApptStart as AppointmentDate” for athenaPractice/CPS, or “rptappt.apptdate as AppointmentDate” for athenaFlow/CEMR.
- At the bottom of the Set Rule Properties dialog box one can set a Schedule so that
the rule is run on a regular basis (daily or weekly and a time of day). Scheduling works
in the same manner as described in the Structured Patient Add Rule
and the user is referred
to the details described in that rule for more information.
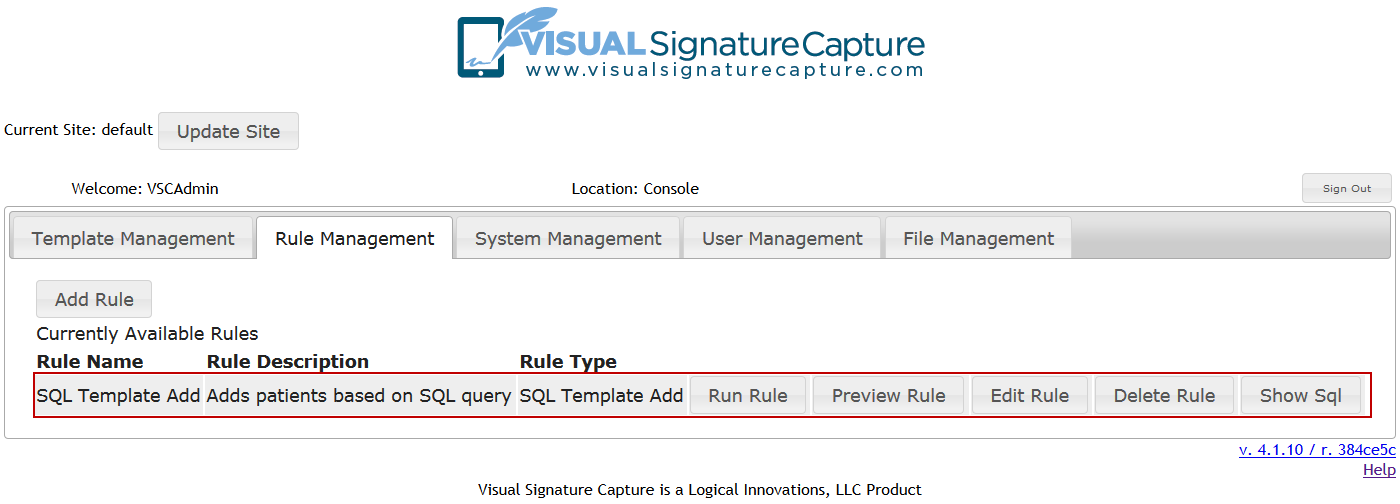
- Click the Save button at the bottom of the Set Rule Properties dialog box and the rule
will be displayed on the Rule Management tab in the list of currently available rules.
- There are five available buttons to the right of the SQL Template Add rule (see screenshot above).
- The Run Rule button runs the rule manually and immediately, updating the patients in the Document tab based
on the SQL query and assigning them the document corresponding to the chosen template regardless
of whether there is a schedule set or not.
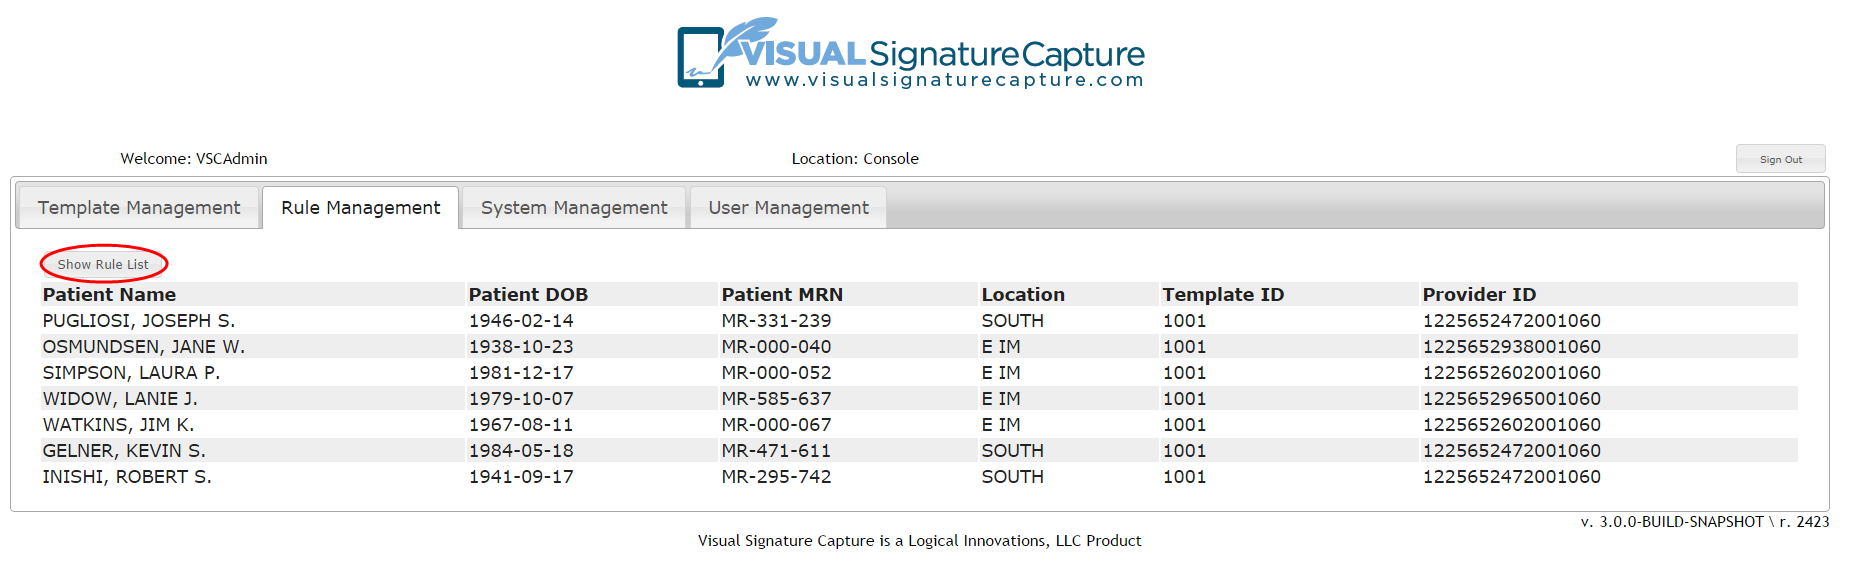
- The Preview Rule Button shows the list of Patients that will be added to the Documents Tab of Staff members
based on the SQL query. The Template ID is also shown (this can be found
on the Template Management tab) along with the Provider ID. To return from this view to the list of currently
available rules, click on the Show Rule List button.
- The Edit Rule button opens the Set Rule Properties dialog box and allows
one to modify the name, description, SQL statement or schedule for the rule.
- The Delete rule button is present in order to delete a rule that is no longer needed.
- The Show SQL button displays the SQL statement that was written for the rule.
Custom SQL Rule
The Custom SQL Rule setup is similar to the SQL Template Add Rule, except that there is no ability to choose a Template or Template Group. This Rule can be used to add patients to the Documents tab using criteria in a SQL query other than today's appointments as used in the Structured Patient Add Rule. The SQL query must start like this:
Select person.pid as PatientUniqueEmrId,person.SearchName,person.sex,person.DATEOFBIRTH as Birthdate,person.MEDRECNO as MedicalRecordNumber,usrinfo.pvid,locreg.abbrevname as Location,locreg.locid as LocationId from...