Editing and Adding Customers and Datasources for Visual Signature Capture
The Application Administrator is in charge of editing and adding Sites to Visual Signature
Capture and setting up database connections for those Sites. Many organizations
use Visual Signature Capture with a single Site (themselves). Some organizations,
such as hosting organizations, provide service to multiple EMR instances. Some clinics have separate Sites set up for front desk and clinical. The use of
multiple Sites on their Visual Signature Capture system is a way to support this setup.
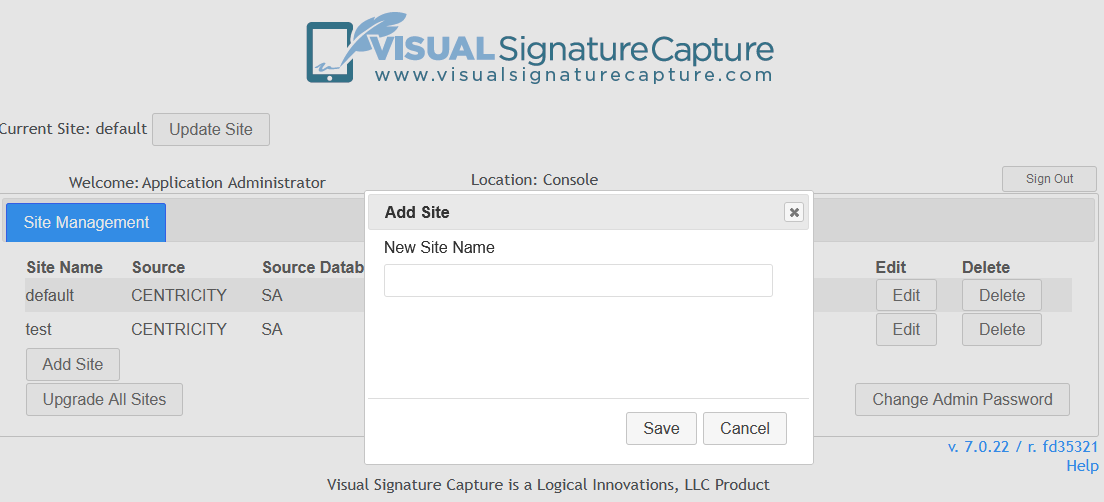
To add a Site to Visual Signature Capture:
- Sign in as the Application Administrator.
- Click the Add Site button.
- The newly created Site will now appear in the list of Sites.
To the right of the Sites are 2 buttons. The Edit button allows
one to edit the Site name as well as set up the database connections
(see below). The Delete button allows one to delete a Site that
will no longer be using Visual Signature Capture.
Once the new Site has been added, two database connection types
need to be established. One is Centricity, the other is Signature.
Centricity is where Visual Signature Capture reads data from
(a read only connection needs to be established).
Signature is where Visual Signature Capture reads and writes
application data. If you are using Visual Signature Capture
in conjunction with athenaPractice (formerly CPS/Centricity Practice Solutions), you
will be creating SQL connections to a Microsoft SQL database.
If instead you are using Visual Signature Capture with athenaFlow (formerly Centricity
EMR), you are either setting up connections to an Oracle database or setting up a connection to a SQL database as with athenaPractice.
Since Microsoft SQL uses multiple databases while Oracle uses
multiple schema within a single database, there are slight
differences in the setup.
To set up connections to a Microsoft SQL database (when using Visual
Signature Capture with athenaPractice):
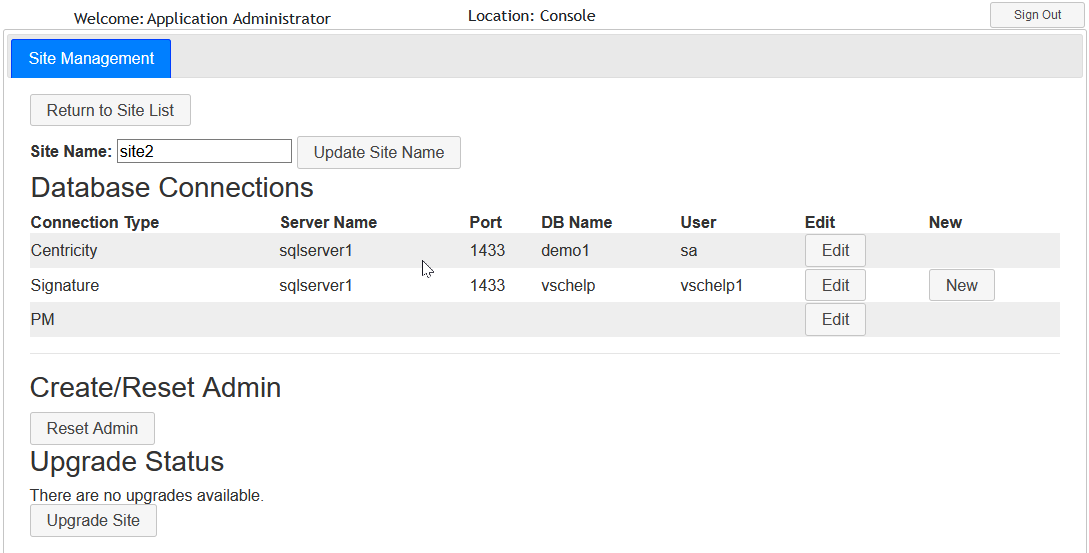
- Click the edit button on the line with the newly created Site
(see screenshot above).
- A new screen will appear showing the three connections that need
to be established (Centricity, Signature, and PM). PM is for athenaPractice systems only.
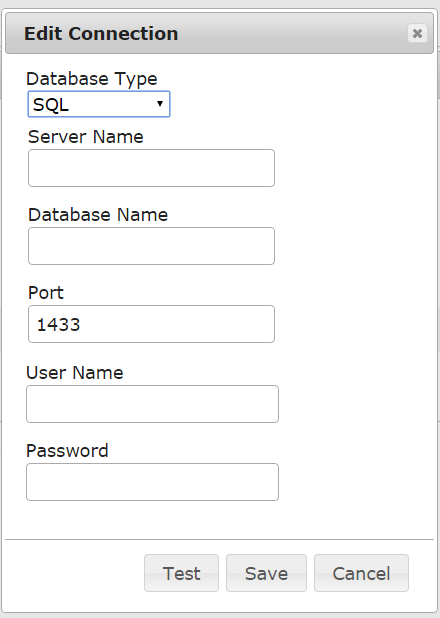
- Click on the Edit button for Centricity (see screenshot above).
A dialog box will appear. From the drop-down list, choose SQL
for the database type. Enter the name of the server where
your organization's athenaPractice database is located and the
name of the database in the appropriate fields. Enter the port
on which you are establishing a connection (typically 1433).
Finally, enter the username and password of a user with permission
to read from the athenaPractice database.
- Test the connection by clicking on the Test button at the bottom of the box.
If the information entered in Step 3 is correct, a message saying that the
connection succeeded will be returned. If the information entered in Step 3
is incorrect, a message indicating that the connection failed
will be returned and you should contact your organization's IT department for help.
- If the test succeeded, Save the connection by clicking the Save
button at the bottom of the dialog box. Answer Yes to the confirmation
message that appears. A message indicating that the database connection
was successfully updated will appear.
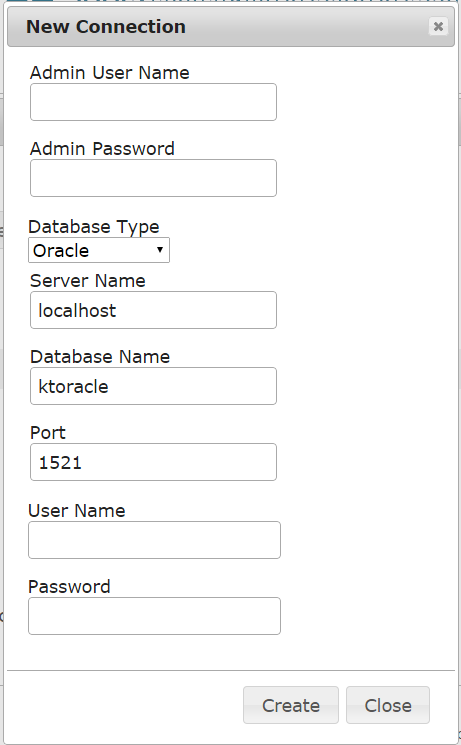
- For the Signature connection, you will be creating a new database
as well as establishing a connection. To create a database and
establish the connection, click on the New button across from
Signature and a dialog box will appear.
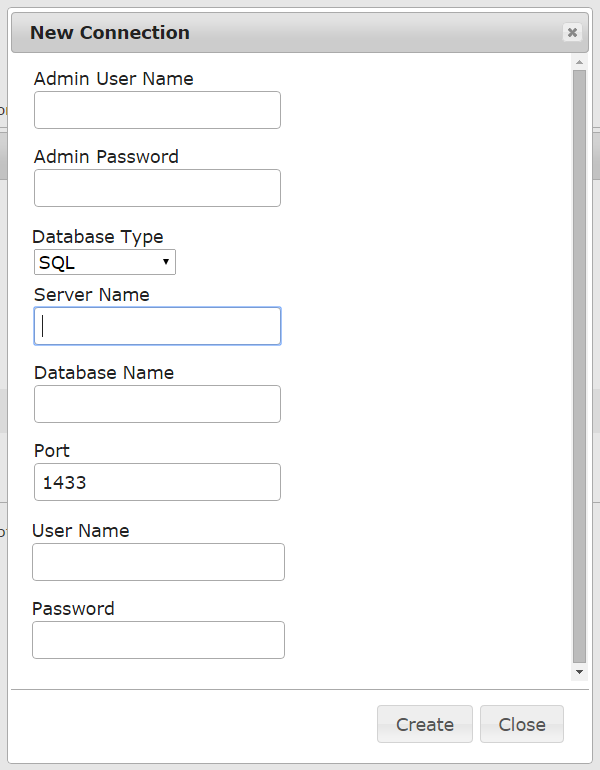
- For the Admin User Name and Admin Password, enter the name and password of a database
administrator with permission to create new databases and new users.
- From the drop-down list, choose SQL for the database type.
- Enter the server name where the Signature database will be located.
This is often the same server as the athenaPractice database entered in
Step 3 above, but does not need to be.
- Choose a name for the new Signature database that will be created.
This field prepopulates with the same name as for the Centricity database,
but it must be changed to something else. The Signature and atheanPractice databases
can not have the same name.
- Enter the port that the connection will be established on. This is usually 1433.
- Choose a username and password for the new database and enter them in the last two fields.
Visual Signature Capture will connect to the Signature database with this
username and password going forward.
- Click the Create button to create the connection. If the information entered is correct,
a message will be returned indicating that the Visual Signature Capture DB was created successfully.
If an error message appears, contact your organization's IT department.
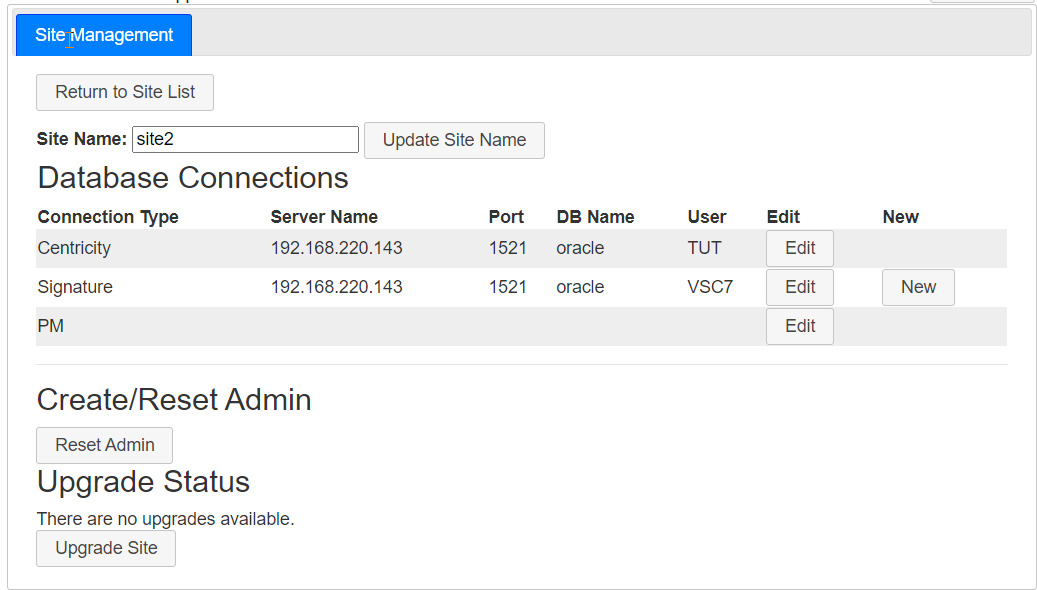
- Your screen should now look like something like this (the server name, DB names,
and user names will be different):
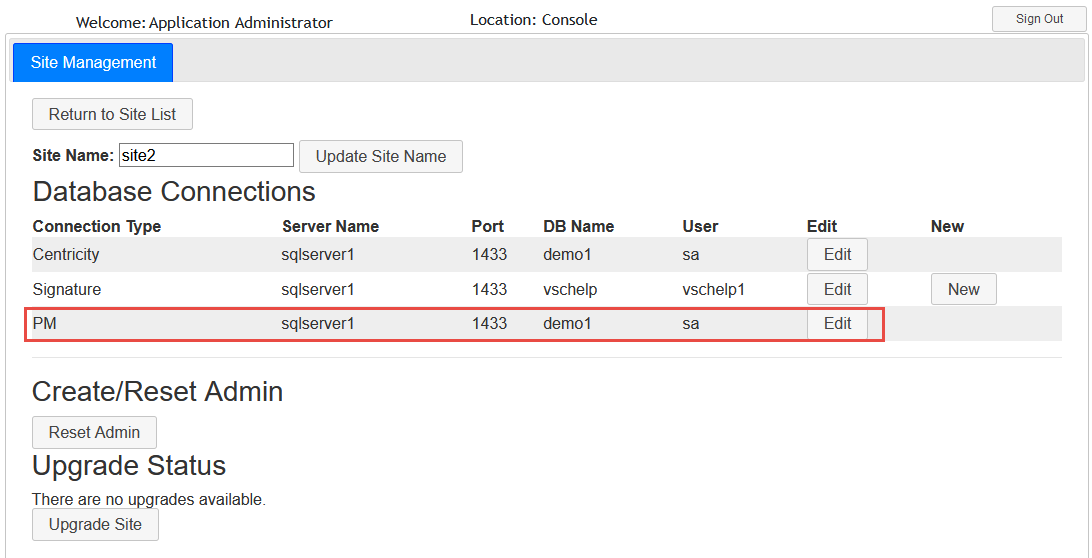
- If a athenaPractice customer plans to:
- Send a PDF directly to the Registration Paperclip and/or
- Update the "Additional" tab in the Registration module of athenaPractice,
the PM database connection needs to be configured. If a customer does not plan to use these
features, the PM connection does not need to be set up.
-
To configure the PM database connection, repeat the same steps above that were used to configure the Centricity database connection. It will differ if the customer is using athenaFlow (with Oracle db) in conjunction with a standalone PM (with SQL db).
The username used must have permission to read and write to the athenaPractice database:
- The Edit button associated with Signature is only needed to re-establish
a connection that has been deleted. It is not typically used when setting
up a connection to the Signature database.
- The Reset Admin button can be used to reset the default Site Administrator.
- The Upgrade Site button is for database upgrades.
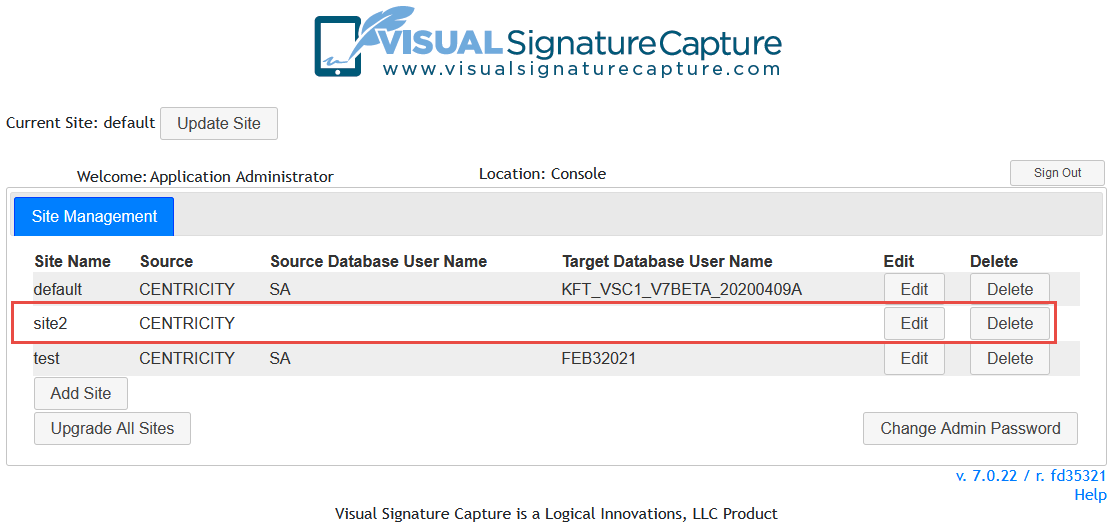
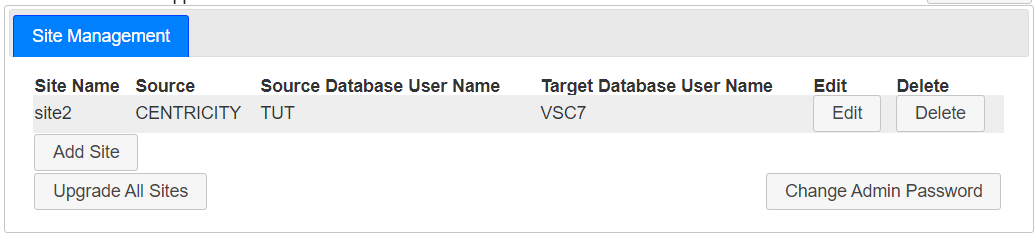
- Click on the Return to Site List button. The source database user name
and target database user name have now been filled in (see screenshot below;
your source and target database names will be different).
- Here again, the Upgrade All Sites button is if a database upgrade
for all customers is being carried out.
To setup connections to an Oracle database (when using Visual Signature Capture with athenaFlex):
- Click the Edit button on the line with the customer that needs connections (see screenshot below).
- A new screen will appear showing the two connections that need
to be established (Centricity and Signature - the PM Connection is not used with Oracle).
- Click on the Edit button for Centricity (see screenshot above).
A dialog box will appear. From the drop-down list, choose Oracle for the
database type. Enter the name of the server where your organization's
Centricity database is located and the name of the database in the
appropriate fields. Enter the port on which you are establishing a
connection (typically 1521). Finally, enter the username and password of
a user with permission to read from the Centricity database.
- Test the connection by clicking on the Test button at the bottom of the box.
If the information entered in Step 3 is correct, a message saying that the
connection succeeded will be returned. If the information entered in
Step 3 is incorrect, a message indicating that the connection failed
will be returned and you should contact your organization's IT department for help.
- If the test succeeded, save the connection by clicking
the Save button at the bottom of the dialog box.
Answer Yes to the confirmation message that appears.
A message indicating that the database connection was successfully
updated will appear.
- With Signature you will be creating a new schema within the
Oracle database as well as establishing a connection.
Optionally, you can use a SQL database for the VSC database. Follow the steps here to use SQL. To create a schema and establish the connection, click
on the New button across from Signature and a dialog box
will appear.
- For the Admin User Name and Admin Password, enter the name and password of a
database administrator with permission to create new schema/users.
- From the drop-down list, choose Oracle for the database type.
- The Server Name, Database Name, and Port Name will be prepopulated
with the information from Step 3 above. Since Oracle uses a single
database with multiple schema, this information should be correct
and left unchanged.
- Choose a username and password for the new schema and enter
them in the last two fields. Visual Signature Capture will
connect to the Signature schema within the Oracle database using this username
and password going forward.
- Click the Create button to create the connection.
If the information entered is correct, a message will be returned
indicating that the Visual Signature Capture database was created successfully. If an
error message appears, contact your organization's IT department.
- Your screen should now look like something like this (the server name, database name, and user names will be different):
- The Edit button associated with Signature is only be needed to
re-establish a connection that has been deleted. It is not
typically used when setting up a connection to the Signature database.
- The Reset Admin button can be used to reset the default Site Administrator.
- The Upgrade Customer button is for database upgrades.
- Click on the Return to Site List button. The source database
user name and target database user name have now been filled in
(see screenshot below; your source and target database names will be different).
- Here again, the Upgrade All Sites button is if a database upgrade
for all customers is being carried out.